MollyMia Aspire to Inspire before we Expire

Sunday, 24 December 2017

Mia Bakes: Oreo / Reese Peanut Butter Cups Stuffed Chocolate Chip Cookies

First up, a very Merry Christmas to y'all! 


It was another #bakingtrio project time and this time, we've not only baked some stuffed cookies, but also enlarged the mini yule logs (recipe HERE) we've baked last year following cupcakejemma's recipe.

I will, very much, advise you to at least HALF the buttercream recipe, or use a much smaller baking tray to get thicker sponge cake. If not you'll end up like us, chocolate-rum buttercream overload. Not that we're complaining though. That buttercream is out-of-the-world delicious.

So now, on to the stuffed cookies!
For roughly about 15 to 16 cookies, you'll need:
60g soften unsalted butter
1 small - medium egg
60g castor sugar
40g brown sugar
120g plain flour
(may need to add more)
1 tsp vanilla extract
1/4 tsp salt
1/4 tsp baking soda
70% cocoa chocolate chips 
(however little or much you prefer)
oreo thins
reese peanut butter cups
Note: I do suggest trying out with standard oreos instead as we found oreo thins a little too underwhelming.

And also, because #bakingtrio prefers to do less sweet, you may want to add a little more sugar if you'll prefer your cookies to be sweeter. Or you might just want to use a sweeter variation of chocolate chips if you fancy. 

First up, cream your butter and sugars until it turns light and creamy, before beating in the egg and vanilla extract. Sift in all your dry ingredients and fold until you do not see large pockets of flour, before folding in your chocolate chips until just combined. 

Make sure your dough is pliable and doesn't stick to your hands excessively (or even too liquidy to work with). Fold in more flour (tbsp by tbsp) if required, until you get a consistency you can work with. Then, use a tablespoon and spoon your cookie dough into 30g dough balls and wrap either an oreo cookie or reese peanut butter cup into each ball. 

This cookie will be slightly cakey and dense, so it wouldn't spread much so do remember to give your dough balls a little press on top to flatten it as you place them about 1.5 inches apart on your baking sheet, before baking them for about 11 to 12 minutes at 175 degree Celsius or until your cookies starts to turn a light golden brown at the edges. 


And I have to say the reese peanut buttercup ones were really satisfying! We decided to use the leftover ganache from the yule log for the oreo stuffed ones too, which kine of make it up for their lack of oomph. 

So, how was your Christmas bakes? Do share them with me!

Till then,
Mia Foo


Wednesday, 20 December 2017

Food Tasting: Burger Monster [Honest Review]

If you still don't know, I'm a huge fan of BURGERS! So while this visit to the latest baby of Chicken Up is a food tasting invite, there wasn't any obligation to put up a blog post about it, so you can take this as a 100% honest review. 
But oh well, I did say I love burgers though. Like, a lot. :)

-credits to yelp.sg-

Located at a corner of Jurong East MRT Station, just below the platform at Level 1, it might be easy to miss the eatery if not for the cute Burger Monster icon on their distinctive white-blue signboard (and "mis-match" Chicken Up's chicken feet logo on the glass panel). 

All these crazy amount of food for just 5 of us (out of which 4 of us are ladies). But we were quick to concede to our impending failure and quickly call-out to our respective partners for help. HAHAHA. 
So in the end, a total of 8 pax (4 couples)... still COULDN'T finish all these food. A lonely slice of the insanely big monster burger was leftover in the end. 

With their standard, and yet still pretty big (like a McD Big Mac), sized burgers going for $5 to $6 dollars, breadrolls at $3 to $8, and other mains (fried fish & chicken etc) going at $4 to $6, this newly opened Korean burger joint has definitely scored a brownie point for offering you quality food with extremely affordable prices. 
Burger Monster also offers a wide variety of small bites and sides, ranging from $2 (Garlic Fried Rice) to $12 (Mini Lobster with Chili Crab Sauce).

To make your burgers/mains a full meal, just top up an additional $3 for fries/garlic fried rice + drink, or $5 to make your drink free flow!
There's also a condiment bar in the eatery, providing 8 different types of sauces, such as cheese, wasabi mayo and yangnyum etc, for you to try out!


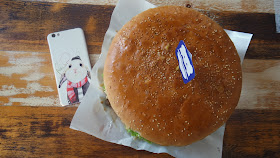
But I guess their most popular dish (that's highly raved on IG) has got to be this massive, 1KG birthday cake lookalike, 22cm big Monster Burger, which comes in either Beef or Chicken Bulgogi flavour. 


Priced at just $20 for this ridiculously huge burger, you can easily feed 4 hungry men with it, no joke. I would even recommend up to 6 (ladies) with a small selection of sides to share for a more comfortable, non-tummy bursting meal. 

Couldn't try this Monster Burger out because I don't take beef, but I did cut pieces of the huge buns to try out and instantly got ADDICTED. These buns are so fluffy, and even slightly crisp at the edges. I think I must have (at least) asked the BF to "cut me a piece of your bread" at least 4 to 5 times while he's eating his two slices of the insanely oversized burger. 

Shark Burger - $6

This has got to be my favourite burger of the day! Thick fillet of fried shark meat topped with (a lot of) shredded onions, sliced tomatoes, fresh lettuce & cheese, and sandwiched between two extremely soft and fluffy buns. The shark fillet is also generously drenched with a spicy and slightly sweet (yangnyum?) sauce that probably helped/serves to cover the otherwise distinctive "fishy" smell of shark meat. And the sauce must have done a great job, because I couldn't taste that "fishy" taste of shark meat at all. The meat was also more moist and tender as compared to our usual dry and tough stir-fried shark meat. 
My only complaint is, the burger is too big to be eaten.... well, like how a burger should be eaten. It is absolutely impossible to get a bite of everything with one bite. Pretty sure all of us ate it the deconstructed-burger way. 

 Grilled Chicken Burger - $5

Even though this pales slightly in comparison to the Shark Burger, I can't deny that it is still a very good chicken burger. There wasn't any special sauce to oomph up the flavour, but the grilled chicken was thick, tender and still pretty juicy. 
And well, you can always add whatever sauce you fancy to this burger over at the condiment bar, so all is good! 


The other two mains, the Unagi Roll ($8) and Fried Seabass ($8) unfortunately didn't do very well at impressing us. I completely skipped the Unagi Roll (because I really dislike Unagi, sorry!) but both the BF and Oyhz claims that the breadroll and the unagi tasted like separated dish. I also found that the breadroll didn't really hold up very well with the unagi, sauce and all. Just a small slice of my knife and the whole unagi roll disintegrated upon itself. 
As for the Fried Seabass, it might have been because we took way too long at taking photos, so much so that it has turned cold and harden. If it's not for the fact that there's another 7 pax waiting to try a bite, I would have just stick my fork in, pick up the entire fillet and take a bite directly out if it. Slicing it was just like slicing through rubber. The meat was also dry and a little tough, probably overcooked. 


Black Ball ($7) & Mini Lobster ($12)

And now for the two dishes which were quite highly anticipated, but failed to deliver. 
The black ball was pretty much just, sotong ball made black. Not sure if they've added in squid ink or not, but... it really just taste like your standard sotong ball, except that it's black. At one point I strongly believed that something special must be hidden within the ball, but there was absolutely nothing. The white bits you see are just small chunks of sotong. 
As for the mini lobster, it's really.... tiny. All the effort of peeling the shell, only to get the meat that's equivalent to HALF the size of a shrimp. But to be fair, the chili crab sauce does taste pretty decent though. 

Burger Monster is located at 10 Jurong East Street 12 #01-01 Jurong East MRT Station
and is open daily from 11am to 10pm.
For more information, visit their facebook page HERE.

Till then,
Mia Foo


Saturday, 9 December 2017

Mia Bakes: Salted Caramel Chip Wholemeal Chocolate Cookies

Now, that sounds like a mouthful isn't it? HAHAHA.
Well, I was looking at my leftover bag of salted caramel chips after baking the Chocolate Lava Salted Caramel Chip Cookie and thought, what else can I make out of this? 
Well, actually you can make anything with salted caramel chips, really. But I was still craving for some half soft-half crunchy cookie, so well... let's go!

To make 12-14 cookies, you'll need:

50g soften unsalted butter
25g baking stevia 
(or castor sugar, if you fancy)
1/2 tsp vanilla extract
1/2 tbsp raw honey
1/2 egg 
(to get half an egg, beat your egg and measure out half of the weight)
10g unsweetened cocoa powder
90g wholemeal flour
(you can use plain flour if you prefer)
1/4 tsp baking soda
a pinch of salt
(or use salted butter and omit salt)
50g salted caramel chips

optional:
dark chocolate chunks
colourful sprinkles

-recipe adapted from geniuskitchen.com-

This really CANNOT be any easier. 
First up, cream your butter and sugar until pale and fluffy, before beating in the egg, honey and vanilla extract. 
Sift in your dry ingredients (do not skip sifting as cocoa powder is always lumpy) and fold until most of the pockets of flour has disappeared, before folding in the salted caramel chips until just combined. 

Drop tablespoonful of your cookie batter onto a baking sheet lined with baking paper, space them about an inch apart. They do spread a bit, but not that much, so do press them down a little with wet hands if you prefer a flatter cookie. 

If you fancy, press in a few chunks of dark chocolate (or any chocolate you like) over the top of the flatten cookie and sprinkle some colourful sprinkles over the top before sending these cookies into the oven at 180 degree Celsius and bake them for about 15 to 18 minutes. 

 And, tadaa~


The sprinkles definitely added a nice, joyous touch to these cookies, which is slightly cakey and right smack in between a crunchy cookie and a soft cookie. YUMS!

Till then,
Mia Foo

Saturday, 25 November 2017

Extend #blackfriday and #cybermonday with Wellaholic! [Advertorial]


Missed #blackfriday on the 24th? Don't think you have the time to shop for #cybermonday? 
Don't fret, because Wellaholic has got you covered!

Starting this Black Friday, Wellaholic has partnered with The Jock Shop and Ohsosom to offer you amazing deals!

With every purchase of a WBeauty Elight Collagen Boost Facial package or a SHR (Super Hair Removal) package worth $149 and more, you get to choose an additional gift from the following options:

His Option - Brand Brief from The Jock Shop (worth $40)
Her Option - Tank Top from Ohsosom (worth $40)

Promo is now ongoing until 1 December, whilst stocks last, so sign up now!
Make your booking by:
Making your purchase HERE and then making your preferred booking slot HERE
or
Give Wellaholic a call at 68168038

Wellaholic is conveniently located at:
Lavender Outlet: 16M Penhas Road (Level 2)
Clarke Quay Outlet: 2 Havelock Road #01-34

Opening hours:
Weekdays from 11am to 8pm
Weekends from 11am to 6pm

For more information, visit their website HERE

Tuesday, 21 November 2017

Mia Bakes: Chocolate Lava Salted Caramel Chips Cookie


Well, guess what? It's LAVA COOKIES, Y'ALL!

Came across the salted caramel chips while randomly browsing the baking aisle at the supermarket and just decided to pick it up without much thought initially. Hahaha, and since I've bought it, I gotta use it right? 
So yup, let's make some salted caramel chips cookies with a chocolate lava centre then!

To make roughly 20 cookies, you'll need:

125g plain flour
60g soften unsalted butter
100g brown sugar
(I've used 35g baking stevia + 30g brown sugar)
1/4 tsp baking soda
1/8 tsp salt
(omit if you're using salted butter)
1/2 tsp vanilla extract
1 small/medium egg
90g salted caramel chips
20 cubes of your favourite dark chocolate
I used 70% dark chocolate, feel free to use milk chocolate or even white chocolate if you fancy them.

First up, cream your butter and sugar together until the mixture turns light and fluffy, then beat in your egg and vanilla extract until well combined. Sift in all your dry ingredients and fold until almost combined before folding in the salted caramel chips.

Your batter should be only very slightly sticky, but still easily pliable. Do add in some more flour along the way if you feel that your batter is too runny. Or else you'll have problems wrapping the chocolate cubes in!

Then, wrap up your batter in cling wrap and leave it to rest in the fridge for 30 minutes to an hour for it to firm up.

After the cookie dough has firmed up, take it out from the fridge and start wrapping your chocolate cubes into 1 heaping tablespoon of dough (I weighed mine and they're about 32 - 35g each). Feel free to pop them back into the fridge if you find that they've gone too soft to work with easily.

Then, place your chocolate-centre cookie dough balls on a baking sheet, spaced 2" apart and bake them at 190 degree Celsius for about 10 to 12 minutes. Keep a watchful eye on them at the 10th minute, they should just be slightly browned at the side and still pale in the centre!

When they're done, they will still be quite fragile, so do be extra careful when transferring them over to a cooling rack. These cookies are best eaten warm, so do not leave them to cool completely before tucking in!

Otherwise, you may also heat the cooled leftover cookies slightly in the microwave for perhaps 30 to 60 seconds to get the chocolate centre molten again before eating!


Look at that molten dark chocolate centre! Best #cheatdayeat ever!

Till then,
Mia Foo

Sunday, 5 November 2017

Mia Bakes: Gluten-Free Oatmeal Chocolate Chip Cookies

Nope, I'm not planning to go on a gluten-free diet because there's tons of ill-informed "weight loss tips" floating out there saying it helps with losing weight. 
IT DOESN'T! 
Gluten is not evil, you absolutely do not need to cut it out unless you're gluten-intolerant or have celiac disease. 
So the reason why I tweaked out this gluten-free recipe based off allrecipes (using quick-cook oats) is because I found a 3/4 full bag of sweet potato flour sitting in the cabinet, and have no idea how it got itself there and how else am I supposed to be using it for. A quick google search tells me it can be used as a replacement for normal wheat flour, and so I thought, alright here it goes!

So let's get over the ingredients so we can get started!


For a batch of roughly 21 to 24 small cookies, you'll need:

115g unsalted butter, soften
60g muscovado sugar
(or light brown sugar)
60g sugarless sugar blend 
(or castor sugar)
80g sweet potato flour
180g quick-cook oats
(180g was all I have left, and it worked!)
1 egg
1 tsp vanilla extract
1/2 tsp salt
1/4 tsp baking soda
100g semi-sweet chocolate chips

First up, cream the butter and sugars until the butter gets "fluffed up" before whisking in the egg and vanilla extract. Add in all the dry ingredients and fold until almost fully combined and then fold in the chocolate chips until just combined. 

Drop tablespoonfuls of the batter onto a baking sheet lined with parchment paper and give each of them a firm press to flatten them down as they will not spread much during baking. 
Send them into an oven pre-heated to 190 degree Celsius for about 15 to 20 minutes, or until the cookies turn slightly golden brown (if you prefer your oatmeal cookies crisp/crunchy like me). 

 And tadaa~

These cookies are crunchy and slightly crisp at the edges, not too sweet, and gluten-free!
Per serving of 1 cookie has 86 kcals with 11.2g carbs, 4.7g fats and 0.9g protein. 

Till then,
Mia Foo

Saturday, 4 November 2017

Opening of DBS Plaza Singapura & Launch of the New DBS Multiplier

-picture credits to DBS-

On 1st November, DBS officially launches their novel 24/7 "cafe and branch" at Plaza Singapura, which features new innovations such as Cash Service Machines, Video Teller Machines, industry-first VR corner for retirement planning and a humanoid robot, Pepper, as a VTM instructor.

-picture credits to DBS-

In its continued journey to re-imagine banking, DBS launched a lifestyle space for the tech generation, where digital banking is complemented by human connection. 

The new cafe & branch at Plaza Singapura features an open layout, to create a relaxed atmosphere. Customers will first be welcomed by the aroma of freshly brewed coffee and baked pastries at the entrance, where Bettr Barista, a social enterprise supported by the DBS Foundation, stands. 
Enjoy a 20% discount when you go for cashless payments using DBS/POSB credit cards or PayLah. How cool is that!


While our usual bankteller counters and ATM/Cash Deposit Machines are still around, they've also gotten a revamp and looked way more cool and hip than they used to be. These new Cash Service Machines not only allows us to do both cash withdrawals and deposits, but also allows us to withdraw cash above our ATM card limit. 
Other than the PS branch, DBS/POSB has deployed close to 90 of these machines in more than 30 different locations across the island.

-picture credits to DBS-

One of the few "ooohh" factor for the night has to be this industry-first VR corner for retirement planning, where customers will be guided on how to go about working towards their retirement lifestyles. 


The second "ooohh" factor for me has to be Pepper, the humanoid robot, and also our VTM instructor. It's just so fun to keep on moving around and having Pepper turning its head around just to continue "looking" at you. Yeah, cheap thrills, I know. 

-picture credits to DBS-

And this has got to the the biggest "ooohh" factor for me that night, the Video teller Machines (VTMs), offering us non-cash banking services such as issuance or replacement of IB tokens or debit cards (you get them INSTANTLY!) round-the-clock. 


No kidding when I said you can get your new card instantly! But as for now, this instant-service is only available for their PassionCard, DBS Visa, and Union Pay cards. 


Customers who require help are also able to access instant 'face-to-face' assistance via live video. 

There are currently 13 VTMs in 12 locations over the island, and the bank plans to install more than 20 machines by the end of 2017. 

-picture credits to DBS-

DBS is also launching TwentyThirty, an online initiative for young adults in their 20s and 30s - a hub providing quality content that is relevant to everyday living. Eg, getting through adulting milestones and financial literacy, career advice and everything else important for a balanced life. 

For more information on TwentyThirty, follow them on Facebook and Instagram, and subscribe to their monthly newsletter on www.twentythirty.com and be the first to know about their exclusive offers and events.

-picture credits to DBS-

And along with the TwentyThirty initiative, targeting young adults, DBS also launches an enhanced DBS Multiplier Account, making it easier for young adults to quality for higher interest rates, with no minimum salary crediting amount, and no minimum credit card spend. 

-picture credits to DBS-

And isn't it cute that they're using rabbits as the mascot? Well, because with this enhanced DBS Multiplier, you can just watch your money grows like bunnies. >.<

The first-of-its-kind programme was first introduced in 2014 to reward customers for consolidating their banking with DBS, with any combination of salary credit, credit card spending, investment dividend or mortgage instalment. And to cater to the financial aspirations of young adults, DBS has launched the enhanced DBS multiplier account, making it easier for young adults with lower spending power to qualify for higher interest rates on their account balances, by simply having their salaries credited with DBS/POSB and transact in one or more of the following categories:

1. credit card spending
2. home load instalment
3. insurance
4. investments

To enjoy higher rates, customers only need to have their total eligible monthly transactions add up to SGD $2000 or more.

DBS Multiplier Account interest rates
*Total monthly transactions consist of salary crediting and one or more of these categories: credit card spend, home loan instalment, insurance or investments.

For more information on this easier way to multiply your money, check out on the new enhanced DBS Multiplier account at www.dbs.com.sg/multi.

Till then,
Mia Foo

Wednesday, 1 November 2017

#wellnesswednesday - What I eat in a day?

Last year, I embarked on a #eatclean diet (read about it HERE) and successfully lost about 8kg of fats. Previously while on a pretty restrictive, 21 days diet, I was eating about 1200 to 1300 kcals a day and obviously on a high calorie-deficit. Hence, the weight just came off like magic.

While some may tell you that calorie-counting is bullsh*t when it comes to weight loss, that's actually not true at all. Because a caloric deficit is what causing the weight loss. What's truly bullsh*t about calorie-counting is blindly looking at pure numbers (calorie count in each food you eat) and ignoring all your macro-nutrients and simply forgetting about the importance of a balanced diet.

For example, going for deli meat options instead of lean cuts of fresh meat just to save on that 60 kcals? No, please don't do that!

So while I've (almost) completely cut out refined sugar in my diet, I guess I'm still pretty much on a 15-85 diet, meaning 15% of the time I get to eat whatever my heart desires. Refined sugars included. That basically worked out to 1 cheat day in a week, which previously makes up about 2 meals. I've recently started eating 3 full meals for my Sunday cheatday due my revamped exercise routine, which added an hour's worth of badminton game with the BF in the late morning, hence I just felt that I earned an extra cheatmeal. #iexercisetoeatmore

First up, for my typical 3 meals on a non-cheatday:

For breakfast:
1 hardboiled egg
1 weetbix biscuit
OR
2 slices of 100% wholewheat bread
(not those fake extra soft 50% wholewheat)
1 tbsp peanut butter
OR
2 homebaked high protein doughnuts
1 tbsp peanut butter
WITH
1/4 cup blueberries
1/2 cup grapes
4 - 6 strawberries
Kopi C Kosong

For lunch:
1/2 cup brown rice
WITH
mixed rice dishes
(1 veg + 1 egg/tofu + 1 meat)
OR
a choice of filling soup
(usually lotus root pork ribs, white fungus chicken, or kimchi jjigae)

For mid-day snack:
1 mug of My Protein Hot Mocha
WITH
1 Nugo Smarte Carb Protein Bar

For dinner:
Homecooked dishes & Soup
(1 veg + 1 meat +1 seafood + Soup)

For evening snack:
1 to 2 servings of fruits
(kiwi, orange, apple, plum, tangerine, starfruit)
Protein Shake
(My Protein Total Protein + HL Milk)

Just eating these alone will get me about 1600s kcals, which according to my fitbit charge 2, is still on a pretty substantial caloric-deficit of up to 1000 kcals a day (on my most active, spinning day).
Hence, judging on the extra calories I've burnt while at gym for the day, I'll usually throw in more food over at the evening snack time slot, with more caloric dense food such as:

nuts or legumes
(peanuts, mixed nuts, almonds, walnuts, chickpeas)

chocolate
(I'm eating My Protein High Protein Chocolate)

cookies / biscuits
(Homebaked wholegrain & sugarless, or Khong Guan Marie Biscuit/Cream Crackers)

However, on my non-cheat days, I will still limit my daily caloric intake to a maximum of below 2000 kcals (I will hover in the 1900s on my spinning day, whereby I usually burn up to 2700 kcals according to fitbit) and hit my macro ratio of 4 (carbs) - 3.5 (fats) - 2.5 (protein). My ideal would be 5-3-2 or even 4-3-3, but... I love fats as much as I love carbs, so it's really kinda tough. :(

2700 - 1900s is a huge caloric deficit of 700+, and that's unhealthy, you might say. But I would advise that you do not be too obsessed on how much deficit or surplus you have on a day-to-day basis, but aim to even it out over the week and achieve your targeted deficit (or surplus, or break-even) as a weekly average.

My non-cheat days deficit ranges from a negligble 100+ kcals (usually on Saturdays, whereby I'm less active) to 700+ kcals. But on my Sunday cheatday *insert smirking face*, I usually eat all sorts of crap and can easily even out my 6 days of deficit by hitting up to more than 3000 kcals in a single day of eating when I burn at most 2000 kcals.

So, how do you eat to maintain a good health? Do share with me your eating habits down in the comment section below!

Till then,
Mia Foo

Saturday, 28 October 2017

Hokkaido Travelogue: Day 5 - Sapporo

This Hokkaido travelogue is taking forever, I know. Just bear with me, yeah? And if you haven't read up about my day 4 (1st full day in Sapporo), do check it out first HERE.

Day 5 started pretty late in the morning as we didn't have that much attractions planned for the day (for they are located pretty far away from each other). 

The Historical Village of Hokkaido!
The Historic Village of Hokkaido (開拓の村, Kaitaku no Mura) is an open air museum in the suburbs of Sapporo. It exhibits about 60 typical buildings from all over Hokkaido, dating from the Meiji and Taisho Periods (1868 to 1926), the era when Hokkaido's development was carried out on a large scale. There are four different sections: a town, fishing village, farm village and a mountain village.

Take the subway to Shin Sapporo Station and locate the bus stop at the roundabout right in front of the station. Do double check the stop's name, as there are more than 1 bus service available at this stop (if i'm not wrong). 
Anyway, here's the bus schedule for your information. I doubt they'll change up the schedule frequently, so you can safely take this as a good gauge.

(click in for full view)

Entrance fee into the village is 1200 Yen per pax, and I would say it's either money well spent or washed down the drain depending on what you're looking for. If you're someone who's really interested in not only the history and culture of Japan, but also their architectures, this is your jam. Otherwise, there may be absolutely nothing here that can spike your interest. 

This will be basically how the entire "themed park" will be like. Set in the olden days of Japan, very big, spacious and... deserted. Throughout the whole of the 3 hours (plus, minus?) we were there, we only bumped into TWO families along the way, and yeah... I think we're probably the only 3 groups of visitors during that time in this pretty vast park. 

I quite liked this place, even though there's actually nothing exceptionally exciting or fun, but there's just this sense of tranquility and peacefulness that we can't seem to find back at home (anymore). 

The park also seems to be properly segregated into aisles/areas, whereby you get a whole street of residential buildings, then the next street of "marketplaces", then schools and so on. 
Most of those shops and eateries over at the marketplace are actually fake, with the exception of just ONE shop located right at the end (if my memory didn't fail me) that's manned by an elderly couple, selling old school Japanese sweet treats. 

I've read of horse-pulled carriages for rides available here at the park, but the sight that greeted me was kind of appalling (HERE). Not sure if this is really available for a ride and at what kind of fees because I really didn't want to get on that carriage.... tram? 
Poor horse. :(

 And now, just a little more of what to expect over at this park...


 And of course, some mandatory #ootd poser shots. >.<


And off we went for our next destination! 
Do note that there's no restaurants located in the vicinity of the historial village, so do plan your time properly if you do not wish to end up starving at the end of the day. 

And here's the bus schedule over at the historial village towards Shin Sapporo Station, for your information. 

The Historial Village of Hokkaido is opened daily from 9am to 5pm. 
For more information, visit www.sapporo.travel

And next up on our itinerary is something that's of a since-it's-on-the-way-then-let's-go-and-see nature, the Fushimi Inari Shrine.


To get to this shrine, get over to Soen Station (on the Hakodate Line) and take bus 11 at Soeneki Bus Stop to Keimei Terminal Bus Stop (15 stops away, if you're counting). The shrine will be about 15 minutes walk UP THE HILL.


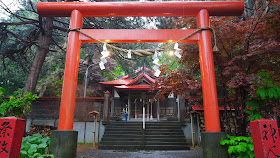
The main attraction of the shrine has to be these bright red torii gates lined up from the entrance along the main road all the way up to the shrine itself. 
Nestled among a quiet residential area, this Fushimi Inari Shrine is not to be confused with Fushimi Inari Taisha in Kyoto, which is much bigger and way more majestic, and definitely way more crowded. But to be fair, we reached right at closing time of 5pm, hence there was absolutely nobody around, except for a local who came in briefly to offer a quick prayer while passing by. 

In my own humble opinion, as long as you do not compare this to the one in Kyoto, the line-up of bright red torii gates will still be able to wow you. :) 


And of course, it's always a good thing for us to be be able to offer some prayers while overseas on a trip, yes? 

Fushimi Inari Shrine (Sapporo) is opened daily from 6am - 5pm.

Our next destination for the day was the last attraction to cover for the day before dinner, and by right, it should be the most highly anticipated one for the day.
But, damn the weather. T.T

First up, let me give you the expectation.

-credit to www.sapporo.travel-

Mount Moiwa (藻岩山, Moiwa-yama) is one of several small, forested mountains southwest of central Sapporo. The mountain is a popular sightseeing spot that is known for the spectacular view out over the city from an observation deck at its summit. The view is especially beautiful after sunset.

The Mt Moiwa Ropeway first climbs from the base of the mountain to 3/4 up the mountain to a transfer station, whereby we were transferred to a mini cablecar that travels the rest of the way up to the upper station at the summit. A return ticket for both rides will set you back by 1700 Yen per pax.

Later on I found out that these bunnies printed in the cable car is the mascot figure of Mt. Moiwa.

Kawaii desu!

Anyway, for us it was 1700 Yen washed down the drain because of super super bad weather while we were there. Right at the base of the mountain (ticket booth) we were told that we won't be able to see anything at the summit with the rainy weather and the surveillance camera up there just showed a full screen of white mist, no joke.
But we were thinking, since we've already walked all the way here, might as well just head up for a look. And so we did!

And before you scroll further, go back up and take another look at the expectation picture.
... ...

And then you see this.
HAHAHA!

If I'm not wrong, it's somewhat like a romantic gesture for couples to get under that pyramid-thingy and ring the bell together. But seriously, with such rainy & foggy weather with nearly 0 degree Celsius temperature strong wind blowing unforgivingly at you in every angle possible up on the mountain, you probably won't even want to step out (into the open) and go ring that bell even if someone were to tell you you will marry Song Joongki or Kim Tae Hee just by ringing it.

And apparently Sapporo is now newly listed as Japan's top 3 night view, along with Kobe (been there, but in the day!) and Nagasaki. So effectively, I've visited 2 of the 3 places on the list, but seen none of the stunning night view. T.T

There's also a restaurant with nice views out over the city, and a small food kiosk selling items like sandwiches and ice cream. 
 And we were quite amused by their labeling of the sandwiches. In case you're wondering what the Katakana means, it literally means what the English words says.
'Bread Sand Ham'.

Despite the horribly cold weather, we grabbed a strawberry ice cream. :)

There's also a planetarium and a theater, showing a show about planets and such. Everything will be in Japanese with no subtitles, and you need to pay an additional fee to watch it. So my advice to you will be, skip it. 

Mount Moiwa (Ropeway) is opened from 1030 am to 10pm (or 11pm on Dec - Mar) daily.

So after bidding the cold and foggy Mt. Moiwa goodbye, we retraced our steps down the road and headed back for Susukino Area (our hotel area).

After coming downhill, turn towards your right and walk further down to the road junction and you should be able to see two tram (they call it streetcar) stations on either side of the junction. Both stations has different service routes, so make sure to check out the map carefully before jumping onto one. Lucky enough for us, the route here brings us directly back to Susukino area.

And guess what's for dinner? By right, on the itinerary, we are supposed to be searching for Garaku's Soup Curry (and expect a long queue too) but due to poor food-planning (I didn't know there's gonna be no food for us at the historial village), the bf and I were simply starving and I suggested trying out Tokyo Sundubu, which was conveniently located at the underpass-walkway near Sapporo Station.
Yes, it's the Tokyo Sundubu that you can find here in Singapore, at Suntec City and Raffles City too.

But the SG ones doesn't do cute hand-drawn doodles on your bibs. 

Plus, I have to admit that I REALLY LOVE KOREAN FOOD.

Day 6 in Otaru is already up right HERE, do check it out!

Till then,
Mia Foo