MollyMia Aspire to Inspire before we Expire

Sunday, 14 March 2021

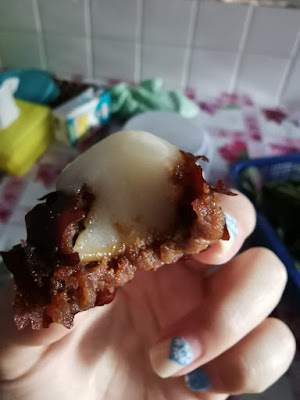
Mia Makes: Mochi Stuffed Red Dates [心太软]

 Recently, my aunt gave my mum a huge bag of big-ass dried red dates she has brought from China and my mum, having watched the Channel 8 timeslip periodic/modern drama (My heroine luo ming yi or something) and saw them making these "心太软" treats, asked if I can try recreating them. 
Well, it's just stuffing "mochi" into red dates and steaming them; can't be hard right? 


So let's get over with the ingredients so we can get started! 
To get about 16 HUGE stuffed dates:

16 (DUH!) LARGE dried red dates
110 - 120g glutinous rice flour
30ml BOILING HOT water
50 - 60ml room temperature water
15 to 20g sugar (to taste)

Optional:
You may prepare some sugar syrup to drench your stuffed dates in, but I feel that it's really an overkill. 

To start, soak your dried red dates in hot water for an hour for them to soften. Then, rinse them clean. Using a small knife, slice them open lengthwise to remove the pit. Do not cut the dates fully into half, but leave them open up like a book. Set them aside. 

In a clean bowl, add in 30g of glutinous rice flour and add in 30ml of hot water. Stir to form a goopy paste. This additional step will help your mochi remains soft when they've cooled (left overnight). Otherwise, you may tweak the mochi recipe by substituting a small portion of your glutinous rice flour with corn flour or tapioca starch. These two flours will also give your mochi a softer, more fluid texture. 
To the goopy paste, add in another 80g of the glutinous rice flour and 50ml of water and mix to combine. You should get a ball of soft and very pliable dough that doesn't stick to your hands. Add more flour or water if required. 

If you are slightly OCD like me, weigh your dough batter to know how much each of your mochi balls should weigh (to fit into 16 dates). I've made myself 16 mochi balls of around 14 to 16g each. 
Then, roll the mochi ball in between your palm to form it into an oblong shape before stuffing it into the sliced red dates. Set the stuffed dates on a heat proof plate; making sure that the mochi portion are not touching each other. 

Then, steam (either in a steamer or in a double-boiler over the hob) for 15 minutes, and you're done! 


The red dates, after getting steamed, will develop a tart flavour, which goes really well with the slightly sweet mochi centre. If you absolutely dislike sourness, you may either add more sugar to your mochi dough, or prepare some sugar syrup (cooking some white or brown sugar in water until it thickens) to pour over your steamed dates. 

Best eaten when still slightly warm from the steamer, as the mochi centre will be extremely soft and chewy! 

Till then,
Mia Foo 

Sunday, 7 March 2021

My #IDSTransformMe Journey: HTT Facial at IDS Aesthetic [Sponsored]

 Earlier in January this year, I was really glad to be able to join IDS on a 4-months #IDSTransformMe Journey in an attempt to achieve a healthier, clearer looking skin. And I have to say, after 1.5 months of using the range of IDS skincare products recommended to me by Dr. Ben Yim, my skin condition has really improved greatly; and I'm very less plagued by the pesky maskne (mask-induced acne) now, and I'm finally starting to win my lifelong battle with my number 1 enemy, the clogged pores. 

Thank you, Pore Formula. Thank you, Blemish Clear.

And now, for the 2nd phase of my #IDSTransformMe journey, I was given a chance to enjoy a session of their Hydro-Therapeutics Treatment (HTT) back at their IDS Clinic/Aesthetic branch at International Building. 

Their monogram colour scheme and a very clean and chic layout of the place really gave me the feeling that I'm placed in good (professional) hands. HAHA!


After a quick follow-up review with Dr. Yim, I was whisked away to one of these treatment room for the HTT facial. 

The HTT (or simply called Hydro Deep Cleansing) is a deep-cleansing facial treatment that everyone can benefit from. Created by professionals and designed for all skin types, this award-winning treatment works hard through various levels of deep cleansing to remove accumulated dirt, product build-up and clogged sebum that no regular cleanser can.

This facial treatment not only helps to unclog pores, but also aids with cellular regeneration and increase our collagen production, hence reducing our fine lines and wrinkles as well. 

The facial treatment started off with the usual double-cleansing, followed by water dermabrasion (or microdermabrasion) to remove our dead skin cells. Then, it was followed by an ultrasonic cleansing to clean out our pores, before the aesthetician carry out the extractions. As I'm super used to getting painful extractions during facial, the aesthetician was considered rather light-handed for my pain tolerance, and I even drifted off into sleep during the procedure. HAHA!
After the extraction, ultrasonic penetration of Vitamin C was applied to my face, before an anti-acne mask was given. 

At this point, I was getting really comfy on the treatment bed (and sleepy as well) and was hoping to catch a quick nap during the masking time. But the anti-acne mask was a minty one, and extremely cold (their masks are all stored in the fridge), so much so that it jolted me awake and drove away all the sleepiness in me. HEH! 


And then, it was some moisturiser and sunscreen and I'm good to go! My skin definitely felt smoother to the touch, and visibly brighter as well (no filter here, but obviously was under very bright white lights though). 

For more information of the services available at IDS Aesthetic, visit their website HERE

Till then,

Mia Foo