MollyMia Aspire to Inspire before we Expire

Saturday 28 October 2017

Hokkaido Travelogue: Day 5 - Sapporo

This Hokkaido travelogue is taking forever, I know. Just bear with me, yeah? And if you haven't read up about my day 4 (1st full day in Sapporo), do check it out first HERE.

Day 5 started pretty late in the morning as we didn't have that much attractions planned for the day (for they are located pretty far away from each other). 

The Historical Village of Hokkaido!
The Historic Village of Hokkaido (開拓の村, Kaitaku no Mura) is an open air museum in the suburbs of Sapporo. It exhibits about 60 typical buildings from all over Hokkaido, dating from the Meiji and Taisho Periods (1868 to 1926), the era when Hokkaido's development was carried out on a large scale. There are four different sections: a town, fishing village, farm village and a mountain village.

Take the subway to Shin Sapporo Station and locate the bus stop at the roundabout right in front of the station. Do double check the stop's name, as there are more than 1 bus service available at this stop (if i'm not wrong). 
Anyway, here's the bus schedule for your information. I doubt they'll change up the schedule frequently, so you can safely take this as a good gauge.

(click in for full view)

Entrance fee into the village is 1200 Yen per pax, and I would say it's either money well spent or washed down the drain depending on what you're looking for. If you're someone who's really interested in not only the history and culture of Japan, but also their architectures, this is your jam. Otherwise, there may be absolutely nothing here that can spike your interest. 

This will be basically how the entire "themed park" will be like. Set in the olden days of Japan, very big, spacious and... deserted. Throughout the whole of the 3 hours (plus, minus?) we were there, we only bumped into TWO families along the way, and yeah... I think we're probably the only 3 groups of visitors during that time in this pretty vast park. 

I quite liked this place, even though there's actually nothing exceptionally exciting or fun, but there's just this sense of tranquility and peacefulness that we can't seem to find back at home (anymore). 

The park also seems to be properly segregated into aisles/areas, whereby you get a whole street of residential buildings, then the next street of "marketplaces", then schools and so on. 
Most of those shops and eateries over at the marketplace are actually fake, with the exception of just ONE shop located right at the end (if my memory didn't fail me) that's manned by an elderly couple, selling old school Japanese sweet treats. 

I've read of horse-pulled carriages for rides available here at the park, but the sight that greeted me was kind of appalling (HERE). Not sure if this is really available for a ride and at what kind of fees because I really didn't want to get on that carriage.... tram? 
Poor horse. :(

 And now, just a little more of what to expect over at this park...


 And of course, some mandatory #ootd poser shots. >.<


And off we went for our next destination! 
Do note that there's no restaurants located in the vicinity of the historial village, so do plan your time properly if you do not wish to end up starving at the end of the day. 

And here's the bus schedule over at the historial village towards Shin Sapporo Station, for your information. 

The Historial Village of Hokkaido is opened daily from 9am to 5pm. 
For more information, visit www.sapporo.travel

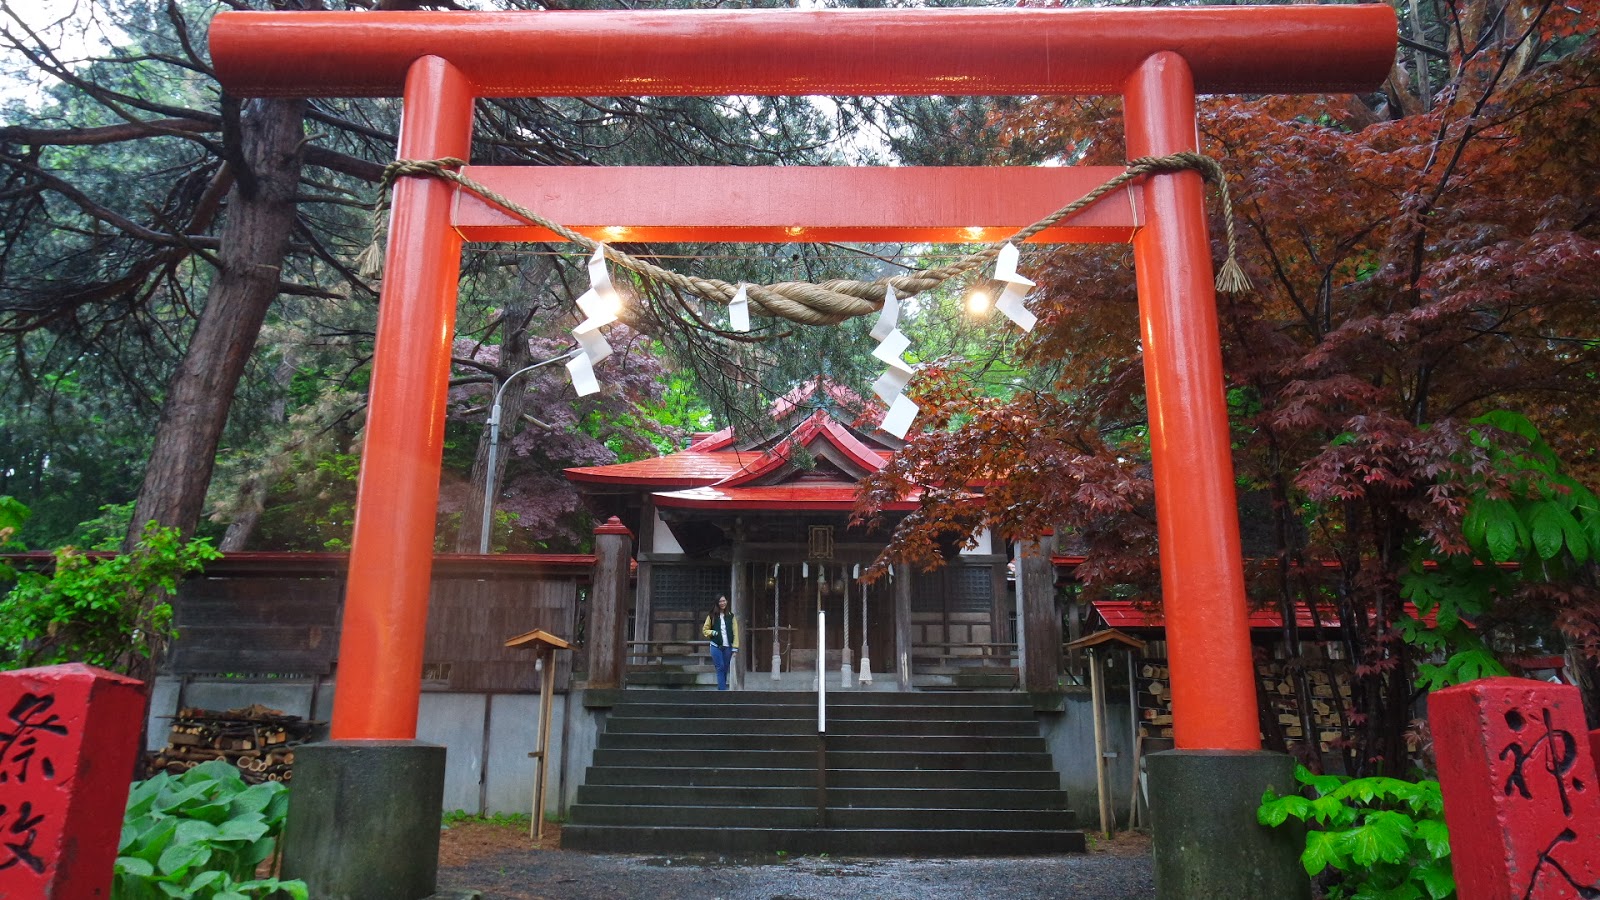
And next up on our itinerary is something that's of a since-it's-on-the-way-then-let's-go-and-see nature, the Fushimi Inari Shrine.


To get to this shrine, get over to Soen Station (on the Hakodate Line) and take bus 11 at Soeneki Bus Stop to Keimei Terminal Bus Stop (15 stops away, if you're counting). The shrine will be about 15 minutes walk UP THE HILL.


The main attraction of the shrine has to be these bright red torii gates lined up from the entrance along the main road all the way up to the shrine itself. 
Nestled among a quiet residential area, this Fushimi Inari Shrine is not to be confused with Fushimi Inari Taisha in Kyoto, which is much bigger and way more majestic, and definitely way more crowded. But to be fair, we reached right at closing time of 5pm, hence there was absolutely nobody around, except for a local who came in briefly to offer a quick prayer while passing by. 

In my own humble opinion, as long as you do not compare this to the one in Kyoto, the line-up of bright red torii gates will still be able to wow you. :) 


And of course, it's always a good thing for us to be be able to offer some prayers while overseas on a trip, yes? 

Fushimi Inari Shrine (Sapporo) is opened daily from 6am - 5pm.

Our next destination for the day was the last attraction to cover for the day before dinner, and by right, it should be the most highly anticipated one for the day.
But, damn the weather. T.T

First up, let me give you the expectation.

-credit to www.sapporo.travel-

Mount Moiwa (藻岩山, Moiwa-yama) is one of several small, forested mountains southwest of central Sapporo. The mountain is a popular sightseeing spot that is known for the spectacular view out over the city from an observation deck at its summit. The view is especially beautiful after sunset.

The Mt Moiwa Ropeway first climbs from the base of the mountain to 3/4 up the mountain to a transfer station, whereby we were transferred to a mini cablecar that travels the rest of the way up to the upper station at the summit. A return ticket for both rides will set you back by 1700 Yen per pax.

Later on I found out that these bunnies printed in the cable car is the mascot figure of Mt. Moiwa.

Kawaii desu!

Anyway, for us it was 1700 Yen washed down the drain because of super super bad weather while we were there. Right at the base of the mountain (ticket booth) we were told that we won't be able to see anything at the summit with the rainy weather and the surveillance camera up there just showed a full screen of white mist, no joke.
But we were thinking, since we've already walked all the way here, might as well just head up for a look. And so we did!

And before you scroll further, go back up and take another look at the expectation picture.
... ...

And then you see this.
HAHAHA!

If I'm not wrong, it's somewhat like a romantic gesture for couples to get under that pyramid-thingy and ring the bell together. But seriously, with such rainy & foggy weather with nearly 0 degree Celsius temperature strong wind blowing unforgivingly at you in every angle possible up on the mountain, you probably won't even want to step out (into the open) and go ring that bell even if someone were to tell you you will marry Song Joongki or Kim Tae Hee just by ringing it.

And apparently Sapporo is now newly listed as Japan's top 3 night view, along with Kobe (been there, but in the day!) and Nagasaki. So effectively, I've visited 2 of the 3 places on the list, but seen none of the stunning night view. T.T

There's also a restaurant with nice views out over the city, and a small food kiosk selling items like sandwiches and ice cream. 
 And we were quite amused by their labeling of the sandwiches. In case you're wondering what the Katakana means, it literally means what the English words says.
'Bread Sand Ham'.

Despite the horribly cold weather, we grabbed a strawberry ice cream. :)

There's also a planetarium and a theater, showing a show about planets and such. Everything will be in Japanese with no subtitles, and you need to pay an additional fee to watch it. So my advice to you will be, skip it. 

Mount Moiwa (Ropeway) is opened from 1030 am to 10pm (or 11pm on Dec - Mar) daily.

So after bidding the cold and foggy Mt. Moiwa goodbye, we retraced our steps down the road and headed back for Susukino Area (our hotel area).

After coming downhill, turn towards your right and walk further down to the road junction and you should be able to see two tram (they call it streetcar) stations on either side of the junction. Both stations has different service routes, so make sure to check out the map carefully before jumping onto one. Lucky enough for us, the route here brings us directly back to Susukino area.

And guess what's for dinner? By right, on the itinerary, we are supposed to be searching for Garaku's Soup Curry (and expect a long queue too) but due to poor food-planning (I didn't know there's gonna be no food for us at the historial village), the bf and I were simply starving and I suggested trying out Tokyo Sundubu, which was conveniently located at the underpass-walkway near Sapporo Station.
Yes, it's the Tokyo Sundubu that you can find here in Singapore, at Suntec City and Raffles City too.

But the SG ones doesn't do cute hand-drawn doodles on your bibs. 

Plus, I have to admit that I REALLY LOVE KOREAN FOOD.

Day 6 in Otaru is already up right HERE, do check it out!

Till then,
Mia Foo

Saturday 21 October 2017

Mia Bakes: Cinnamon Rolls

It's been a while since I've gotten the breadmaker and I've progressed from baking soft and fluffy refined white bread to the healthier, dense and tough 100% wholegrain bread. And judging that it's just 1 day away from my weekly cheatday (whereby I eat whatever I want, refined carbohydrates, sugar, whatever!), I decided to try out a non-breadmaker bread recipe that I've been wanting to try out. 
CINNAMON ROLLS! 
I've googled up a few recipes that looks more or less similar to each other and decided to just go ahead with nigella.com and incorporate yudane method into it to get softer, fluffier rolls with a little wholegrain.

So let's get over the ingredients so we can get started!

For the yudane dough:
40g (minus 1/2 tsp) all purpose flour
1/2 vital wheat gluten
40ml boiling water

For the bread dough:
20g wholemeal flour (couldn't resist adding it!)
1 tbsp (15g) vital wheat gluten
125g all purpose flour
35g soften unsalted butter
1/8 tsp salt
1 tsp instant yeast
20g granulated sugar
1 tsp ground cinnamon
95ml milk (lukewarm)

For the filling:
35g soften unsalted butter
35g muscovado sugar
(you can use brown sugar or white sugar)
2 tsp ground cinnamon 
Raisins (optional)

First up, prepare the yudane dough by mixing the flour and VWG with boiling water in a bowl and stirring until it comes together to form a sticky dough. Wrap it in cling wrap (to prevent drying out) and set aside (or pop it into the fridge) to cool down. 
Remember, do not add the scalding hot yudane dough directly into your bread dough mixture!

So while the yudane dough is cooling down, add your yeast to lukewarm milk and set aside for about 10 minutes or until it starts to froth up. 

I suggest that you add about 60 to 80ml of the milk at this stage first as the total amount of liquid may vary from flour to flour. It's always better to start off with a drier dough and add more liquid, as opposed to having to add a lot more flour and ending up with a much larger loaf than expected. 

Then, add in all the dry ingredients and cooled yudane dough and start mixing/kneading (I used my BM for this, but you can always use a mixer with dough hook or do it by hand!) until it starts to come together into a dough ball. At this stage, knead in the soften butter until well combined. You may add in more milk or flour judging from the dough's texture at this point. Continue kneading until you achieve windowpane stage. Check for the windowpane stage by taking a small piece of the dough and stretching it out with your fingers. You should be able to stretch it for quite a bit until the dough gets really, really thin and almost translucent before it finally breaks apart. 
On my Mayer BM12, I first ran mix dough function, followed by ferment dough function. 

Otherwise, form your bread dough into a smooth ball and place it in a greased bowl, cover with cling wrap and leave it in a warm place to proof for 1 hour, or until it has doubled in size. If your oven does not have a proofing function, then perhaps you can set your dough bowl in the oven (switched off!) and place a bowl of hot water underneath. That should work too. :)

While the dough is going through 1st proofing, prepare the filling by simply mixing the soften butter, sugar and cinnamon together into a paste. 
When the dough is done proofing, turn it out onto a clean surface (I have a non-stick silicon mat for this) and give it a few quick kneads to knock out all the air bubbles first, before rolling it out into a 9 by 5 inch (roughly, about there.... I just eyeballed it) rectangle. Spread the filling all over, leaving about half an inch around the perimeter. If you fancy some raisins, sprinkle a handful evenly over the surface before rolling the dough up on the long edge. Give the seam a few soft nips to make sure that it doesn't fall apart when you slice it. 
And yup, slice away! Cut the log into 9 1-inch pieces and set them cut side up on a lightly greased 9 by 9 inch baking pan. 
Then, cover slightly with a cling wrap and leave it in a warm place for 2nd proofing for about 15 to 20 minutes (or until the rolls "grow" into each other and completely fills up the pan). 

Brush the top of the rolls with egg wash (very important if you want pretty looking rolls) and set the rolls to bake in a pre-heated oven at 225 degree Celsius for about 12 to 15 minutes (I baked mine for 15 minutes but as we all know baking time varies from oven to oven). 


I skipped the egg wash out of laziness and ended up with dull looking cinnamon rolls. T.T 

If you would prefer not to add in wholemeal flour, just replace the whole recipe with just all purpose flour (you can skip the VWG as well, as adding VWG is just my habit after baking wholegrain bread for so long, it just feels incomplete without adding them in). 
Due to the yudane dough, these rolls ended up so soft and fluffy (a bread texture I've almost forgotten after switching to wholegrain) and it made my entire kitchen smelled so good while baking in the oven. 
ALL THOSE SWEET, CINNAMON, BUTTERY SMELLS....

And 1 roll is only about 150 kcals, pretty decent for a #cheatdayeat yes?

Till then,
Mia Foo


Saturday 7 October 2017

Media Tasting: Barashi Tei

After a previous food tasting session at Barashi Tei last year, which was filled with tons of yummies, I was really glad to be invited for another food tasting session once again to try out some of their new items on the menu!

Deep Fried Softshell Crab - $12.80 

You can never go wrong with a big, fat softshell crab that's deep fried to perfection and served crisp and piping hot on a plate. The only bad thing about this is that you're actually on a diet but it's so hard to stop popping them into your mouth. 

Unagi Don - $18.80

I'm definitely not an unagi fan (I really dislike the meat's texture and exceptionally hates biting into the cartilage bits) but this was pretty okay! Although the distinctive "overly-tender" texture of the unagi can't be avoided, the marinate was definitely yummy and it made the overall dish less unappealing for me as a unagi-hater.

Ika Kabayaki (Grilled Squid) - $16.80

It's obvious even from the picture that this squid is humongous! Though not the most tender and juicy grilled squid you can find, I still find this a good pairing with perhaps, a pint of iced cold beer.

Chawanmushi - $4.80 / Ikura (Salmon Roe) Chawanmushi - $6.80

Barashi Tei has upped their chawanmushi game by topping them up with ikura! However, as I'm not a fan of these neon-orange salmon roe, I went for the standard plain ones instead, which was equally good! I love mixing in some tongarashi (Japanese chili powder) into my chawanmushi. Ground pepper does work too, but it's not really the same. 
 How about you?

Unagi Salmon Mentai Maki - $14.80

This was one of the two variations of salmon maki that were introduced to us that night. Even though I'm not that much of an unagi fan, this suit my palates a little better as it has a lighter, less complex taste to it. The slice of salmon and mentai topping pretty much overpowered the small slice of unagi wrapped in the middle as well, so I hardly noticed the distinctive unagi taste and texture within.

Spicy Salmon Maki - $14.80

The more jerlat (strong flavoured) salmon maki cousin of the Unagi Salmon Mentai, the Spicy Salmon Maki has a big fat ebi fry (fried breaded shrimp) wrapped in the middle of the rice roll and topped with seared salmon and spicy cream-roe sauce. 
The combination of the soft and tender seared salmon with crisp and crunchy fried breaded shrimp and a generous dollop of the spicy cream sauce gave the maki a more complex texture (and also a little bit harder to eat it all in one mouth). 

Sashimi Moriawase - $28 (for 12 pieces)

Must try for all sashimi lovers out there! I'm hardly a fan of raw fish, and especially avoid eating any while in Singapore as they can never be fresh enough to not give you the fishy taste (I can still taste them regardless how subtle). But the sashimi Barashi Tei serves were really fresh and I could manage keeping a few slices down (if I wanted to). I mean, I can eat them if you want me to. But honestly speaking I just do not truly appreciate sashimi so it's better that I leave it for the others who are true sashimi lovers, right?
Don't judge me.

And then, back to a few of the popular dishes we had in our previous media tasting...

Ishikari Nabe Set (Salmon Head Hotpot) _ $18.80

This time, we were served the salmon head instead, but the soup remains equally yummy and comforting!

Tamagoyaki - $5

And almost everyone went "JI DAN!" (Egg, in Mandarin) when this tiny plate of tamagoyaki was served. And a few of the bloggers actually bought takeouts of this back home. 
Undoubtedly one of the most popular dish I've ever seen at a media tasting event. 

Foie Gras Sushi - $15.80 (for 2 pieces)

One of the dishes of the night that also received tons of "oohs" at the table. This time, their popular foie gras has ditched the previous partner (sirloin steak) and found.... sushi rice! Although it may seem a little pricey at almost $16 for just two pieces of sushi, but Barashi Tei are actually pretty generous with the cut and if you're a die-hard fan of foie gras, this will definitely be worth your penny.

Barashi Tei is located at
266 Middle Road
Elias Building
Singapore 188991

Till then,
Mia Foo