MollyMia Aspire to Inspire before we Expire

Sunday, 18 December 2016

Mia Bakes: Cocoa Nibs Crunchy Cookies

Okay, I promise this shall be the last baking post I'll do for this year. And the reason for this bake post is because of two new 'babies' I've bought on iherb.


Raw cacao sweet nibs to replace our sugar (and fat) laden chocolate chips.

And a 1:1 sugarless sugar replacement that supposedly bakes and tastes exactly like sugar. 


I've previously baked 1 batch of chocolate chip cookies following their 1:1 replacement instruction and also using semi-sweet hershey's chocolate chips and the result was... SUPER SWEET
So my advice to you is, do not follow the 1:1 replacement instruction. Start low, with about 50% reduction and then slowly work your way up if it's not sweet enough for you. 

So now, let's get over the ingredients so we can get started:

For 15 (1 tbps-sized) cookies, 
60g unsalted (soften) butter
100g AP flour
10g potato starch
(you may sub with corn flour/starch)
15g top flour
(you may sub with cake flour)
1/2 tbsp honey 
(you may replace this with milk and increase your sugars)
25g brown sugar
25g baking sugar substitute (sugarless sugar)
(you may use castor sugar)
1/4 tsp salt
1 egg (small to medium size)
1/4 tsp vanilla extract
1 & 1/4 tsp baking powder (or 1/2 tsp baking soda) 
1/4 cup organic raw cocoa sweet nibs
(you may use normal chocolate chips)

You can get the sugarless sugar, cocoa nibs and other ingredients I've used HERE.

The baking procedure is basic and standard. First up, cream your soften butter and sugars until pale and fluffy. Beat in your egg, honey and vanilla extract until well combined. Sift in all your dry ingredients and fold until just combined before adding in your cocoa nibs and folding your batter until the nibs are evenly distributed.

Using a tablespoon, spoon the batter onto your baking sheet lined with parchment paper. If you're chilling your dough, the cookies will NOT spread at all hence you MUST flatten your cookies and you may position them closer together on your baking sheet. 
Chill your cookie dough (on the baking sheets) in the fridge until they're harden up and bake until they're beautifully browned on the surface. 
I can't advise you on your oven setting and baking time as I've baked them in my mum's air fryer/roaster, which works very differently from a conventional oven. 
Anyway, just FYI, I baked mine at 215 degree Celsius in the air fryer for 5 minutes first before cranking down the temperature to 180 degree Celsius for the next 25 minutes. 
The AF bakes much, much, muuccchhhh slower as compared to an oven (my oven broke down and I haven't gotten a new one) and based on past experience with my oven, the cookies should bake within 15 to 20 minutes (depending on how thin you've flatten them) at 170 - 180 degree Celsius in a conventional oven.


These cookies are crunchy throughout and kept their crunchiness over the days they lasted. Due to addition of cornstarch and top flour, they're slightly crumbly and tender, like a shortbread cookie. 


But the cacao nibs killed it all. T.T
Contrary to those raves on iherb reviews, the nibs tasted sour with a weird, herbal aftertaste. It wasn't even the cocoa bitterness I enjoy in my dark chocolates. Texture wise, some were crunchy while some were overly crisp, somewhat crackly, and it made me feel as though I'm biting onto eggshells.

So my conclusion is, unless you're really desperate to follow through with an extremely 'healthy diet' and absolutely need to find a healthy alternative, if not just stick to your good old chocolate chips, please!

Till then,
Mia Foo

Thursday, 15 December 2016

Mia Bakes: Soft & Fluffy Wholegrain Fruit & Nut Loaf (BM Recipe)

Despite telling myself I'm happy with my dense and heavy wholegrain loaf, I couldn't help but keep googling for 'soft and fluffy wholewheat bread recipe' and was just disappointed over and over again when all of the recipes I've clicked in with titles similar to "softest and fluffiest healthy wholemeal bread" pretty much just had 10% wholemeal flour and 90% refined bread flour.
Erm, how can you even call that a healthy wholemeal bread when by ratio, it's effectively still a refined bread?

And so (out of spite?) I decided, let me reverse that and use 10% refined flour! HAHAHA, okay I'm kidding. But I really started adding small amount of all purpose flour into my wholegrain loaf because that 3/4 full pack of AP flour has been sitting in my baking cabinet for a while now and I feel that if I don't finish it, weevils will grow soon, so.... yeah, you got it.


Anyway, for this SOFT and FLUFFY wholegrain loaf, you'll need:

185ml (cold) milk
28ml honey
(I wanted to put 30ml but 28ml was all I could squeeze out)
200g wholemeal flour
25g dark rye flour
25g all purpose flour
3.5 tsp vital wheat gluten
(I might have added more per 1/2 teaspoonful hence you may use up to 4 tsp)
1/4 tsp baking powder
1/4 tsp apple cider vinegar
1/4 tsp ceylon cinnamon
1/4 tsp salt
Abt 4.5g instant yeast
(if you're using mayer BM12, it's 1 full small measuring spoon + slightly less than 1/4)
30g unsalted butter
choice of chopped dried fruits & nuts 
(i used sunflower seeds, and a mix of raisins and cherries)

First up, add in your wholegrain flours and cold milk into the pan and let it sit for 30 to 45 minutes
Then, add in all your ingredients, except butter, and start your machine on mix dough function. Add in your butter only when your dough starts to form a ball. As different brands/batches of flours will have different hydration levels, do keep an eye on your dough and make sure it's hydrated enough. Eg. if it's sandy and tough like a beach ball, add in more liquid (preferably by the 1/2 teaspoonful) and if it's watery and formless, add in more flour.
Upon completion of the mix dough function, check your dough for windowpane stage, It won't stretch as thinly and beautifully as a 100% refined flour loaf, but it should stretch  and thin out quite a bit. If the dough is still lacking in elasticity, restart your machine on mix dough function again for another round of mixing.
After your dough is done mixing, restart your machine on graham or multigrain function and let the machine do the wonders! Oh, do remember to add your chopped fruit and nuts during the machine's feeding beep, too!


Giving you a 'bend test' to show that this loaf is really soft and fluffy. :)

Till then,
Mia Foo

Monday, 12 December 2016

Mia Bakes: Mini Yule Logs & Gingerbread Cookies

Tis the season to be jolly, fala lalala lala lala~


Yes, the #bakingtrio has gathered once again for some fun X'mas baking! In case you're wondering what's Smojtocl, it's actually SM . JT . CL (our initials).

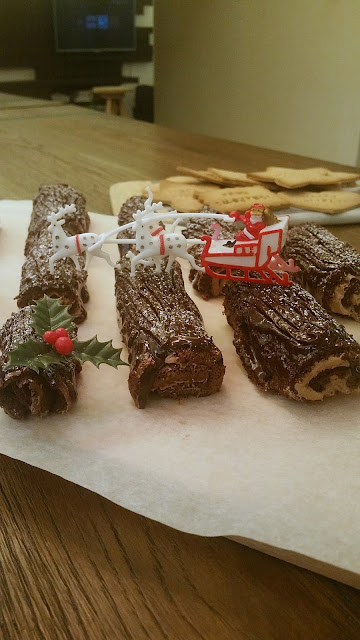
Anyhow, let's start off with the more interesting one, the mini yule logs! We followed CupcakeJemma's recipe, but made some tiny changes here and there to bring you 16 (actually it's 15 and a half) mini chocolate log cakes!

So the ingredients you'll need for 1 batch of the sponge cake are:
3 large eggs
75g caster sugar
25g unsweetened cocoa powder
1 tsp cinnamon powder
1/2 tsp ground ginger
a pinch of ground cloves
10" by 14" baking tray

note: 1 batch gives you 8 mini logs and we baked 2 batches because we've only 1 tray. 

First, separate the yolks from the egg whites and beaten the egg whites (preferably with a mixer) until it gets frothy. Add in 25g of caster sugar in 3 additions, beating the egg whites till stiff peaks are formed. Be sure to not get any egg yolk in your egg whites, just a tiny drop of yolk is enough for your meringue to NOT form!

In another bowl, mix the yolks and 50g of caster sugar and beat till it turns pale and thick (you may beat the yolks with a mixer stained with meringue but not the other way round!) Then, sift in all your dry ingredients and fold in gently. Then, temper your egg yolk mixture with about 1/3 of your meringue (just add in the meringue and stir to loosen up the yolk mixture) before adding all the rest of the meringue in and fold until they're JUST combined. DO NOT overmix as it will deflate your meringue too much and you won't get a nice sponge.
May I also suggest that you do the mixing lightly with a hand-whisk instead of folding with a spatula if you're not that confident with your folding skills.
Then, pour the cake mixture into your lined baking tray and level them out gently with a spatula. Make sure they're as leveled as possible so as to not get holes in your sponge cake!

Bake the cake at 180 degree Celsius for 10 - 12 minutes (depending on your oven) or until the top of the cake bounces back nicely when pressed down lightly.

When the cake has cooled down a little, turn it out and gently peel off the parchment paper before leaving it to cool completely. Do cover it with a clean tea towel to prevent the sponge cake from drying out. It won't take that long for it to dry out as it's extremely thin.

So now, on to 1 batch of the buttercream filling, you'll need:
60g of chocolate
(we used semi-sweet choc chips, but I recommend that you got for 70% dark as we found our filling a little too sweet)
100g unsalted butter
90g icing sugar
2 tbsp rum (or your preferred choice of alcohol)

First, melt your chocolate over a bowl of hot/simmering water. Make sure your chocolate bowl does not touch the simmering water if not your chocolate may burn!
Then, beat the soften butter with icing sugar until it turns pale and fluffy (you may want to check if the buttercream is ready by rubbing some between your fingers to make sure it's not longer grainy). Add in the melted chocolate and alcohol and beat until it's well combined.

Then, spread your buttercream onto the sponge before cutting them up into 8 slices and start rolling! It doesn't matter that your sponge is cracking at the surfaces as the chocolate ganache will save you. Just make sure that your mini roll cakes are able to stay together as a roll, that's all you need to focus on.

Finally, let's move on to the chocolate ganache, your saviour for all your crackly mini logs! The ingredients you'll need are:
100g dark chocolate
100ml whipping cream
(original calls for 115ml heavy cream)

Heat up your whipping cream in a pot until it just starts bubbling (simmering, not boiling) and pour the hot cream over your chocolate. Let it sit for a minute before stirring at the mixture until all the chocolate has melted.
And then start drizzling!


After all your logs are generously covered with the ganache, wait for it to set before using a fork to draw out the grooves of the log.

So you'll end up with these!
And finally, sprinkle some icing sugar over the top and viola~

Your mini yule logs are done!

And well, realising that we still have time we decided to give gingerbread cookies another go (we ended up with  gingerFAT man last year). After a quick recipe search online, we agreed to work with Jamie Oliver's easy and fuss-free gingerbread cookies recipe. 

And so what we added into our cookies are:
300g cake flour 
(our AP flour grew weevils)
2 tsp ground ginger
1 tsp cinnamon powder
1/2 tsp ground nutmeg
3 tsp baking powder
(or 1 tsp baking soda)
125g unsalted butter
100g brown sugar
3 tbsp maple syrup

In a point, melted the butter together with the sugar and maple syrup and stir until all the sugar dissolves. Then, add the mixure to the dry ingredients and mix until it all comes together to form a dough ball. 
Roll your dough out to 5mm thickness and start cutting out your cookies into any shape(s) you fancy! There's no need to chill the dough before rolling it out as it's a really easy dough to work with, soft and malleable, yet not sticky. 
Do work fast though, because it dries our pretty quickly and soon it all turned into a mixture that resembles more of moist sand. But if you really wish to save your dried out dough, just add in some more water, knead, and re-roll.  

And the main reason why we decided to bake the cookies was to try out J's new toy. Cookie cutter that allows you to print out messages on the cookies!
Tadaa~ 
The cookies are crisp and crunchy throughout instead of being the soft, bread-ish kind of cookies, which I really like! But J was thoroughly disappointed because she would very much prefer having a soft, bready cookie instead.

And to end off this post, I shall show you one more picture of our awesome mini yule logs!

Till then,
Mia Foo

Friday, 9 December 2016

Focus Hairdressing: Back to Black with Oway Hcolor (Special Discount For ALL Readers!)

After getting my c-curls last month with Focus Hairdressing, I returned to visit Ken again to get rid of my yellow hair! Yes, unfortunately, even after chopping of more than half of my locks, I still have some leftover hair that's previously bleached.


See that glorious tuff of shiny orange ends there? I swear the lighting has made them less hay-ish. And yes that's my geeky glasses sitting on the counter right there. HEH! 


And I'm glad to be able to try out their new organic and ammonia free hair colour, Hcolor, from OWay. 


Compared to other ammonia-free hair colouring system in the market, Hcolor has more colour options available and also comes with a pleasant, sweet-floral fragrance and gives you a reduced likelihood of respiratory and skin irritation, even in the most sensitive of individuals. Hcolor respects the hair fibre and the hair's physiological pH, hence helping our hair to maintain its structure. 


And after the going back to dark brown, it's time to give my scalp some attention with Oway scalp treatment. 


At Focus, their Oway treatments uses 100% biodynamic (which, I'm told is better than organic), micronised plants to target 3 main scalp issues:

1. Purifying - To treat dandruff and flakes
2. Rebalancing - To regulate excess sebum
3. Soothing - To soothe sensitive scalp

If I didn't read the catalogue wrong, I think Oway originally have another treatment system specially for hair-loss, but Focus do not offer that option as the previous 3 treatments all have anti-hair fall properties.


And it just so happens that I've been experiencing abnormal hair-fall recently after switching to a brand new shampoo/conditioner, and so soothing treatment it shall be!

The treatment has a very strong herbal scent and gave my scalp an icy, tingling sensation.

And now, showing you my before-after pictures...

Obviously the before: look at all those sebum! 

After: All traces of sebum wiped out and my scalp felt thoroughly cleansed.

And as I've mentioned earlier, I've been experiencing abnormal hair loss recently due to a change in shampoo/conditioner that doesn't suit me, and this treatment actually did work to reduce my hair fall! I've stopped seeing like, countless strands of hair sticking to my palms when I shampoo/condition my hair these days.
HUGE THUMBS UP!

Lastly, to end off the day, Ken gave me another colour treatment, Milbon Deesse's Aqua Smooth Veil Treatment. This Milbon Deesse's treatment is also a 3-step treatment and is quite similar to Mucota Scena (read my review of it HERE). The treatment creates 3 layers to treat and infuse the hair with moisture instantly, repairing and smoothen our hair from inside out. 

However, to be brutally honest, I would have much preferred sticking to Mucota Scena (is it psychological or what?) as I felt that my hair turned out much smoother with Scena as compared to Milbon. The silky effect of the treatment after my regular hair washes, somehow, also lasted longer with Scena, but it might be because my hair wasn't c-curled back then?

Oway Hcolor is now priced at $100 - $150 (for my hair. it was $140) and you only need to top up $60 to get Oway scalp treatment (usual price $90).

And for now, Focus Hairdressing Chinatown will be giving all you lovely readers a special discount of 15% off Oway Hair Colouring service.

All you need to do is to flash my blog page (molly-mia.blogspot.sg) on your mobile phone to enjoy the special discount!

And now, signing off with my #blackhairselfie

Till then,
Mia Foo