
MollyMia Aspire to Inspire before we Expire
Showing posts with label chocolate cake. Show all posts

Friday, 31 July 2020

Mia Bakes: 44 Calories Chocolate Cake

Oh yeah, a 44 calories chocolate cake. 
Wait, WHAT? FORTY-FOUR calories, CHOCOLATE cake? 
Yes, you read that right. And that wasn't a clickbait title, nor some portion size reduction trick. I'm going to share with you a recipe I've found on Oat Fiber's youtube channel, for a friggin 44 calories chocolate cake of a decent portion size that WILL fill you up. 

And here's what's 40 calories of chocolate cake look like. 
And the trick here, as I've said is NOT portion sizes, but oat fibre (I got mine from NuNaturals off iherb.sg)! 
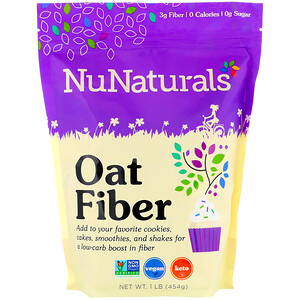
Oat fibre comes from the fibrous husk of the oats, which is pure insoluble fibre and hence, virtually indigestible and therefore contains zero calories, carbs and nutrients. It helps to pack a load of insoluble fibre into our diet, which helps to reduce constipation (provided you're drinking enough water), promotes a full feeling for long periods of time and may even help to reduce over LDL cholesterol. 

Okay, the "health benefits" of oat fibre aside, the bigger benefit of oat fibre (for fellow ladies watching your calories), is that it is ZERO calories and helps to add bulk to your food. For example, you can get your usual 4-pancake stack into a 6-pancake stack without any additional calories just by adding oat fibre! This is literally a godsend for me right now, being unable to do any form of legit exercise for the next 2 months due to a tailbone fracture.

Anyway, let's get over with the ingredients, so we can get started.

For 1 serving (I made mine in 2 silicon cupcake moulds): 
1 tbsp plain flour (27.5 kcals)
2 tbsp oat fibre (0 kcals)
1 tbsp unsweeten cocoa powder (10 kcals, I used Hershey's)
0.5 tbsp 0 calorie sweetener of your choice (0 kcals)
1 tbsp 0 calorie maple flavour syrup (0 kcals) 
1/8 tsp baking powder (0 kcals)
half of 1/8 tsp baking soda (0 kcals)
1 tbsp low fat milk (6 kcals, I used FairPrice housebrand)
1.5 - 2 tbsp water (0 kcals)

adapted from Oat Fiber

Making this can't be any easier, just dump all the dry ingredients into a small clean bowl (you can sift your cocoa powder if they're too lumpy), give it a quick stir with a fork to get them well combined before adding in the wet ingredients (except the water) and stirring until well combined. Then, add in enough water to get the batter to a pourable, cake batter consistency.

Then, transfer the batter into a mould of your choice and STEAM it, either in your steamer if you have one or in a large pot of boiling water, covered, for about 15 to 20 minutes, until a toothpick inserted comes out clean.

The thing about oat fibre, is that it gives a very dry and crumbly, yet also wet and mushy texture to baked goods, if you've replaced too much of the flour with it. So steaming this cake is the way to get your cake coming out tender, moist and fudgy, just like a fudgy brownie. 

If you're not hard up on saving the calories, I'll strongly suggest that you pop in a tablespoon of chocolate chips as well to add in more flavour to the cake. Otherwise, this will be an extremely healthy tasting cake. But hey, it's only 44 calories and it's of a decent serving size that will fill you up. What more can you ask for, right?

Till then,
Mia Foo

Saturday, 4 March 2017

Mia Bakes: 4-Ingredient Rich Chocolate Cake

Yes, you saw it in the title. A yummy chocolate cake recipe that only calls for 4 ingredients, well... 5 if you count baking powder, but... oh well!

Let's get over with the 4 simple (or 5) ingredients to get this rolling. 
You'll need (for an 8 to 10 servings):

200g chocolate of your choice
10g top flour 
(or cake flour)
44ml skimmed milk + 6g cornstarch 
(otherwise you can use 50ml heavy cream)
2 large eggs
1/4 tsp baking powder

As you can see, chocolate makes up a large portion of the recipe, hence it's is very important that you choose a good quality chocolate. I used Hershey's, although some may not feel that Hershey's is a "good enough" brand of chocolate, but it'll do for me. 

And also to control the overall sweetness of the cake, I mixed up their sugar-free dark chocolate (60g) with their semi-sweet chocolate chips (140g) to make up the 200g. I would have wanted to use more sugar-free, but 60g was all I've left. T.T


And so, first up, break up your chocolates (if you're using bars) into tiny pieces and melt them over a pot of simmering water over the hob, constantly stirring until they're smooth and glossy. Be sure that your simmering water does not touch the bottom of your chocolate bowl, or you might burn your chocolates. 
Then, add cornstarch to your skimmed milk and mix until the mixture thicken, before adding it into your melted chocolate and stirring until it's well combined. 
Add in the two beaten eggs and mix until well combined before sifting in your dry ingredients and mix till combined. 

Pour your mixture into a 18x8cm long cake pan (to get a taller cake) or a 26x6.5cm pan (to get a flatter, more brownie-looking cake) and give it a few taps on your counter for any bubbles to rise. 

Send your pan into the oven, heated to 170 degree Celsius for 20 to 25 minutes. 

Now, here's the important thing.

If you're looking for a more fudgey, moist and gateau chocolate cake like consistency, you actually may omit the baking powder and bake your cake for only 20 minutes. There's no need to do the toothpick test to check if your cake is 'done' because your toothpick will not come out clean.

However, if you prefer a more cakey and dry consistency like me, bake your cake for up to 25 minutes (also depends on your oven and its settings) until it's fully baked through. 


Taste wise, it's extremely rich and chocolate like a brownie, but without the usual dense and heavy texture of a usual brownie. 

As you can see, this recipe omitted the usual butter found in most brownie recipe, hence cutting your calories by... abit. Well, there's still tons of chocolate so you can't expect this to be a low-calorie treat. 

Hence, estimated calories per 1 of 8 servings is about 144 kcals, which definitely is not your most diet-friendly snack, but still not that bad for a #cheatdayeat treat, yes?

Till then,
Mia Foo


Monday, 12 December 2016

Mia Bakes: Mini Yule Logs & Gingerbread Cookies

Tis the season to be jolly, fala lalala lala lala~


Yes, the #bakingtrio has gathered once again for some fun X'mas baking! In case you're wondering what's Smojtocl, it's actually SM . JT . CL (our initials).

Anyhow, let's start off with the more interesting one, the mini yule logs! We followed CupcakeJemma's recipe, but made some tiny changes here and there to bring you 16 (actually it's 15 and a half) mini chocolate log cakes!

So the ingredients you'll need for 1 batch of the sponge cake are:
3 large eggs
75g caster sugar
25g unsweetened cocoa powder
1 tsp cinnamon powder
1/2 tsp ground ginger
a pinch of ground cloves
10" by 14" baking tray

note: 1 batch gives you 8 mini logs and we baked 2 batches because we've only 1 tray. 

First, separate the yolks from the egg whites and beaten the egg whites (preferably with a mixer) until it gets frothy. Add in 25g of caster sugar in 3 additions, beating the egg whites till stiff peaks are formed. Be sure to not get any egg yolk in your egg whites, just a tiny drop of yolk is enough for your meringue to NOT form!

In another bowl, mix the yolks and 50g of caster sugar and beat till it turns pale and thick (you may beat the yolks with a mixer stained with meringue but not the other way round!) Then, sift in all your dry ingredients and fold in gently. Then, temper your egg yolk mixture with about 1/3 of your meringue (just add in the meringue and stir to loosen up the yolk mixture) before adding all the rest of the meringue in and fold until they're JUST combined. DO NOT overmix as it will deflate your meringue too much and you won't get a nice sponge.
May I also suggest that you do the mixing lightly with a hand-whisk instead of folding with a spatula if you're not that confident with your folding skills.
Then, pour the cake mixture into your lined baking tray and level them out gently with a spatula. Make sure they're as leveled as possible so as to not get holes in your sponge cake!

Bake the cake at 180 degree Celsius for 10 - 12 minutes (depending on your oven) or until the top of the cake bounces back nicely when pressed down lightly.

When the cake has cooled down a little, turn it out and gently peel off the parchment paper before leaving it to cool completely. Do cover it with a clean tea towel to prevent the sponge cake from drying out. It won't take that long for it to dry out as it's extremely thin.

So now, on to 1 batch of the buttercream filling, you'll need:
60g of chocolate
(we used semi-sweet choc chips, but I recommend that you got for 70% dark as we found our filling a little too sweet)
100g unsalted butter
90g icing sugar
2 tbsp rum (or your preferred choice of alcohol)

First, melt your chocolate over a bowl of hot/simmering water. Make sure your chocolate bowl does not touch the simmering water if not your chocolate may burn!
Then, beat the soften butter with icing sugar until it turns pale and fluffy (you may want to check if the buttercream is ready by rubbing some between your fingers to make sure it's not longer grainy). Add in the melted chocolate and alcohol and beat until it's well combined.

Then, spread your buttercream onto the sponge before cutting them up into 8 slices and start rolling! It doesn't matter that your sponge is cracking at the surfaces as the chocolate ganache will save you. Just make sure that your mini roll cakes are able to stay together as a roll, that's all you need to focus on.

Finally, let's move on to the chocolate ganache, your saviour for all your crackly mini logs! The ingredients you'll need are:
100g dark chocolate
100ml whipping cream
(original calls for 115ml heavy cream)

Heat up your whipping cream in a pot until it just starts bubbling (simmering, not boiling) and pour the hot cream over your chocolate. Let it sit for a minute before stirring at the mixture until all the chocolate has melted.
And then start drizzling!


After all your logs are generously covered with the ganache, wait for it to set before using a fork to draw out the grooves of the log.

So you'll end up with these!
And finally, sprinkle some icing sugar over the top and viola~

Your mini yule logs are done!

And well, realising that we still have time we decided to give gingerbread cookies another go (we ended up with  gingerFAT man last year). After a quick recipe search online, we agreed to work with Jamie Oliver's easy and fuss-free gingerbread cookies recipe. 

And so what we added into our cookies are:
300g cake flour 
(our AP flour grew weevils)
2 tsp ground ginger
1 tsp cinnamon powder
1/2 tsp ground nutmeg
3 tsp baking powder
(or 1 tsp baking soda)
125g unsalted butter
100g brown sugar
3 tbsp maple syrup

In a point, melted the butter together with the sugar and maple syrup and stir until all the sugar dissolves. Then, add the mixure to the dry ingredients and mix until it all comes together to form a dough ball. 
Roll your dough out to 5mm thickness and start cutting out your cookies into any shape(s) you fancy! There's no need to chill the dough before rolling it out as it's a really easy dough to work with, soft and malleable, yet not sticky. 
Do work fast though, because it dries our pretty quickly and soon it all turned into a mixture that resembles more of moist sand. But if you really wish to save your dried out dough, just add in some more water, knead, and re-roll.  

And the main reason why we decided to bake the cookies was to try out J's new toy. Cookie cutter that allows you to print out messages on the cookies!
Tadaa~ 
The cookies are crisp and crunchy throughout instead of being the soft, bread-ish kind of cookies, which I really like! But J was thoroughly disappointed because she would very much prefer having a soft, bready cookie instead.

And to end off this post, I shall show you one more picture of our awesome mini yule logs!

Till then,
Mia Foo

Thursday, 3 September 2015

Mia's Bangkok Travelogue: Hello Kitty House

Well, even though I'm not that much of a Hello Kitty fan (but I'm a pink fan), I still went in the end....
To Sanrio Hello Kitty House! 

Heh, actually this cafe wasn't part of my itinerary and I didn't even know where it was, until we stumbled upon it while searching for Eve And Boy at Siam Square and it kind of became a "since I saw it so I have to go" place.


The Hello Kitty sign is so huge, it's impossible to not see it as long as you're around Siam Square.


To dine in, we need to register with the usher and get a designated table on the floor plan given to us. If you can't read maps to save your life, good luck to you because you absolutely have to find your own table. This is a non-serving cafe and staff doesn't serve you at all, be it taking orders, delivering orders, or even showing you to your table. 


The entire cafe interior just screams HELLO KITTY and PINK! To all guys out there, it's better not to step foot into this cafe unless you're accompanying girls. It may really get kind of awkward. Heh!


The ridiculous cuteness does not just end at their decorations, but extended to their cakes and pastries as well. Look at those rainbow cakes and cheesecakes! 

You can also grab a Kitty head ice cream at 90 baht too. It's a little too pricey, I know. But what to do? Put a Hello Kitty head on anything and its price will two-fold. 

I got the Berry Smoothie while T chose one of their Iced Tea. 

The jelly balls in the tea was pretty fun to eat, but the drink itself was way too sweet for us. 

So was my Berry Smoothie. I couldn't even bear to finish it in the end because it just got way too sweet for me. 

And of course, even though I'm nowhere near being hungry (and still pretty full even) I still got myself a chocolate cake in the shape of a kitty head! 

Very rich, smooth and sweet, this decadent chocolate cake is a must try for all chocolate loving Hello Kitty fans out there! 

Hello Kitty House is located at Siam Square One, Bangkok. 
For more information, visit there Facebook HERE

Till then,
Mia Foo

Friday, 11 October 2013

Mia's Update: ParkRoyal on Pickering

This is a pretty late entry, for I've visited a Junior Suite at ParkRoyal on Pickering last month for a friend's birthday party. The hotel is located conveniently at 3 Upper Pickering Street, opposite Hong Lim Park, which is a mere 5 minutes walk from Clarke Quay MRT Station.

 The main entrance
 The interior of the hotel
credits to booking.com
 The 'green' exterior of the hotel building
credits to booking.com

ParkRoyal on Pickering, a PARKROYAL Collection hotel, redefines the metropolitan skyline with a unique hotel concept offering 15,000 square metres of lofty sky gardens, and an exclusive rooftop Orchid Club lounge that offers amazing 360 degree views of the Singapore city skyline for club room guests. Strategically located at the gateway to Singapore’s dynamic Central Business District, opposite Hong Lim Park, the hotel offers an ideal base for work or exploring the city. ParkRoyal provides modern comfort in their rooms and suites, and a dedicated wellness floor with terrace pool, spa and a jogging track high above the street level.
They are the newest hotel in the PARKROYAL portfolio and one of Singapore’s greenest hotels – proud recipient of the BCA Green Mark Platinum Award.
-adapted from Hotel Website-  

And now, let the picture do the talking first.
The corridor leading to our suite. 
 The separated lounge area with an executive desk and pretty bay windows. And yes, we were setting up Wii in the room. :)
 The bedroom, surrounded by 2 sides of bay windows, and a standard sized wardrobe.

And a pretty luxurious bathroom, with a separated WC (toilet) that wasn't pictured, a his and hers mixer basin stand, and the actual wet area with a bathtub and standing shower area. 
 The (non-complimentary) mini bar was well stocked up with chocolate bars, canned drinks and alcohols.
 The complimentary coffee machine and tea bags were pretty well stocked up as well. 

Room wise, there's absolutely no complaints. The suite was done up nicely with pretty ID finishes and provision of mood lighting that gives a luxurious feeling. Though homeowners might not truly appreciate the abundant existence of bay windows in their houses, I believe having them in hotel rooms will definitely be a plus point that serves to prim up the overall mood of the room. Just imagine spending a nice, quiet afternoon sitting at the bay window, reading your favourite book under the warm sunlight that streams in through the large windows.

The brilliance of the suite aside, I have to say that their service is really not up to the mark, yet. Unlike our previous staycation with The Quincy Boutique Hotel, whereby a friendly staff will show us up to our room and give us a detailed room tour to explain to us where were all the gadgets and equipments located and how to operate them, there was none of such thoughtfulness from ParkRoyal. We were left on our own, trying hard to figure out how to even on the lights to the bathroom!
On top of that, despite us requesting to check in at an earlier time, which we weren't rejected in the first place, we were informed that our check in will be delayed as the suite wasn't ready, even after their standard check in time! In the end, we were offered another suite. Nevertheless, the damage has been done as the initial room number holds a special meaning. 

Lastly, their service was really slow! We had some problems connecting our Wii to the TV and called the concierge for techical support. About (minimum) half an hour later, nobody turned up at our suite and we called again, to be told that they'll send the technician up soon. The technician didn't show up at our suite until at least another half an hour later. 
1 hour wait for technical support? Are you kidding me?! 

In spite of all the disappointment with their standards of service, we still had a great time together. At the end of the day, it's still the company that matters. :)


Just showing off the mad awesome chocolate cake we had that night. The whole cake was so rich and chocolatey. The most sinful indulgence of the night. Simply decadent! 

Till then,
Mia