MollyMia Aspire to Inspire before we Expire

Friday, 26 June 2020

BestInSingapore's SushiDelivery [Sponsored]

Couple of months ago, I've received a table full of yummy treats from sushidelivery.sg (review HERE). This time round, I'm super elated to have Best In Singapore sending over more delicious treats from sushidelivery.sg again! 

Drool-worthy, yeah?
This time round, bestinsingapore.com has sent over a great selection of bento, maki rolls, salad and sides/appetizers from sushidelivery.sg. 

Chicken Karaage Set Bento - $10.90 (usual RTP $14)

Currently only selling at $10.90, this bento set is a steal! Comes with a generous serving of chicken karaage that has managed to retain most of its deep fried crispiness upon delivery, along with a generous portion of fresh salad (that's so colourful and appetising!), chuka wakame and umeboshi! There's something addictive about eating plain Japanese pearl rice with umeboshi, don't you agree? 

Kani Salad - $6.90 (usual RTP $8.30)

Judging at how well sushidelivery.sg does their side salads for the bento sets, I've high expectations for their actual salads and I must say I'm not disappointed. Although the portion size is not impressive enough to fill me up (but I have to say, it takes alot to get me full), the selection of vegetables (lettuce, purple cabbage, bell peppers and cherry tomatoes) are super fresh and goes well with the roasted sesame dressing. The amount of shredded kani (crabstick) and tobikko (flying fish roe) added on top of the salad was also super generous, more than enough for me to have a substantial amount of "meat" in every bite.

And now for the maki rolls and sides. 


California maki was one of the few sushi that I started eating when I first got introduced to Japanese food, and they're still one of my favourite go to sushi now. Some comes with avocado, but sushidelivery.sg roll theirs with cucumber, which added a nice crunch to the overall mouthfeel. The generous coating of tobikko on the outside also added a nice savoury touch to the overall taste; you just cannot mess up a california maki.
The Kappa (cucumber) maki was pretty basic, but definitely a great choice to have if you're watching your diet. HAHA!

Chuka Kurage - $4 (Usual RTP $4.67)

I remembered having these (seasoned jellyfish) in my bento set in the previous menu, and they were really good when paired with the steamed rice. But eating them straight up on its own got a little too salty. You definitely need rice to go with this.


So glad to have these yam net sponge roll in the menu again, as I really LOVE them! 
(my review of them HERE)


Look at that crazy amount of katsuobushi (bonito flakes)! And I love that they only added the minimal amount of mayo over the top, and packed more separately instead of just drenching everything. 


There's basically two types of Takoyaki, the more "deep-fried" kind that comes with a slightly crispy exterior and an overall firmer bite and the more authentic Japanese kind, which are softer and more mushy in the centre. Well, I believe the latter is more authentic because that's how the takoyaki tasted like when I had them in Japan. These are definitely the authentic kind, with the centre just barely cooked to retain the slightly gooey, mushy interior. 


My Huawei P30 failed to pick up the bits of shrimp inside here, but they're there. HAHA! I'm not a fan of "balls" (meatball, sotong ball etc) in general and this kind of tasted like a sotong ball with bits of shrimp added to it. But the crouton coating was a huge plus point though, making these super crunchy and addictive. 

For more information on what Sushi Deliver has to offer, visit their website HERE.
And for more reviews to find out the best things Singapore has to offer, visit bestinsingapore.com

Till then,
Mia Foo


Tuesday, 23 June 2020

Mia Bakes: Mochi Brownies

I've been toying with the idea of mixing mochi and brownies (my two favourite desserts!) together, but never really put my thoughts into actions. And then I realised that there's really something called Mochi Brownie, and I decided that I definitely have to try it out!

But due to my not-working-very-optimally oven replacement appliance (that's something similar to an airfryer, but weaker), I had to bake mine at very high temperature (nothing gets fully baked through at temperature lower than 225 degrees Celsius) and so I ended up with pretty ugly looking, deformed mochi brownie cupcakes. But the taste was definitely not affected. So let's get over with the ingredients so we can get started.

For 6 mochi brownie cupcakes, you'll need:

80g glutinous rice flour
15g baking stevia 
30g muscovado sugar (or brown sugar)
if not using stevia, just use a total of 60g brown sugar instead
10g unsweeten cocoa powder
15g melted butter 
100ml milk 
1/4 tsp instant coffee
1/2 large egg (about 26g, beaten)
1/2 tsp baking powder
1/4 tsp baking soda
a pinch of salt (omit if using salted butter)
60g semi-sweet chocolate chips

recipe adapted from Spoonful Passion

First up, add 10 to 15ml of milk (from the total of 100ml required) to the instant coffee and warm it up in the microwave such that the granules will dissolve. If you do not have a microwave, you can replace with as little hot water as you can manage to get the granules fully dissolved. Then, set it aside. 
In a large bowl, add the melted butter to the sugars and mix until incorporated. Then, mix in the half-egg and mix until well combined before stirring in the milk and coffee mixture. Then, add in all the dry ingredients (except the chocolate chips) and whisk until everything is well combined. 
Spoon the batter into your muffin tin, either sprayed with some non-stick cooking spray or greased with butter. Then, drop the chocolate chips into each well (about 10g worth into each well). 

Bake in the oven that's pre-heated to 180 degree Celsius for about 20 to 25 minutes, until a toothpick inserted comes out clean. 

As I said, because I need to bake mine at ridiculously high temperature in order to have them fully baked through, all my brownie cupcakes kind of "exploded". 

But they're still super yummy! Rich chocolate flavour with a texture that's both soft and fluffy, yet chewy. 

See how bouncy it is! <3

Till then,
Mia Foo


Monday, 15 June 2020

Does home workout (youtube videos) work?

Holding a LIFETIME gym membership, I would never expect myself to be following some fitness youtubers' videos, doing home workouts right in front of my computer desk.
But I did; for the past month. Circuit-breaker, look what you've made me do. Pre-CB, I hit the gym (for group x classes) at least 5 days a week, doing mainly spinning and hot yoga classes, along with some weight resistance (bodypump, sculpt/cxworx) and other form of cardio (bodystep, bodyattack). During 1st month of CB, I ended up jogging for 6 days a week and that really put a strain on my poor knees. Eventually, I decided that 4 days a week is the maximum I'll jog, and for the other 3 days, I will just stay at home and do some home workouts instead.

The first fitness youtuber's channel I've hopped onto when I decided to start working out at home was Natacha Oceane, as I've always been watching her fitness related videos from time to time. But then I realised that she doesn't have that much workout videos on youtube (she mainly post them on her IG instead), and being more intermediate/advanced, her routines tend to include a lot more movements and jumping, hence requiring a lot more space than I can squeeze out in my humble bedroom.

And so I've went on to search for a whole load of other fitness youtubers and tried out their routines, and the two channels I've been always going back to for my super quick, daily 20 minutes 'lunchtime workout' are Holly Dolke & MrandMrsMuscle.

First up, I absolutely love how short & area specific Holly Dolke's routines are. From super short 6 minutes cardio workouts, to 7 minutes abs workouts to 15 minutes HIIT/Tabata workouts; I can easily stack a couple of her videos together, back to back, to complete my 20-25 minutes lunchtime workout. For example, I typically get my heart rate up with her cardio or HIIT/Tabata workouts before doing 1 or 2 more of her area specific workouts (usually abs, legs or booty).

Then, I stumbled upon MrandMrsMuscle's channel when I wanted to add in some dumbbell arm routines into my lunchtime workouts. Love how easy to follow their routines are, with a huge selection of routines to choose from. From short 10 minutes beginner's (no jumping) cardio, to higher intensity cardio, to slightly longer (16 to 20 minutes) body toning exercises. It doesn't matter what your fitness level is, or if you own any dumbbells or not; you can always find a suitable routine to follow on their channel.

And for my alternate days 1 hour (or more) evening workouts, I will usually stack two 30 to 45 minutes full body toning & cardio routines from Kit Rich or Emi Wong. I also love following nourishmovelove's Cardio Barre routines, which are really fun to follow but can get pretty tough on my thighs.
Out of these 3 youtubers, Emi Wong's videos are actually the easiest to follow, as her presentation is more like Holly Dolke and MrandMrsMuscle (timed circuits with breaks in between each exercise), with a beeping timer added such that you know when to stop the exercise even if you're not looking at her on your computer screen. However, I tend to prefer to not follow her videos that much (even though she also has shorter ones) as her form isn't really that great. But if you're the kind who would feel better (less demoralised) when you see others struggling along during the workout (feels more realistic?), then perhaps you can check her out. But also do note that she also have some really questionable workout routines like one for the collarbones (like, WHUTT?), which really got me dumbfounded.

And just a side note, I've also followed Chloe Ting's Get Abs in 2 Weeks Abs Workout for (DUH!) two weeks. This has to be one of the most popular abs workout video on youtube, with over 151 MILLIONS views till date and a whopping 3.3 MILLIONS thumbs up. There's also tons of review videos, boasting of unbelievable results in just two weeks of following her programme, which consist of a couple other workout videos as well and not just this 10 mins abs workout. 

And well, here's my results (from only doing her 10 mins abs workout video in the programme).
My 11 lines definitely became a lot more obvious after just 1 week of doing the 10 minutes abs workout during my lunchtime workout (usually paired with other short cardio and dumbbell routines).

Unfortunately, I was having my period bloat during week 2, so the final results weren't that obvious. 
In addition, do note that I did see (some faint) results only because I was also doing other cardio exercises along with this 10 mins abs workout, and watching what I eat. 

Actually, if anybody (fitness influencers) tells you that you can spot reduce (eg. follow their 10 minutes abs workout video for 2 weeks and get shredded abs etc), it's the biggest telltale sign that you should not take any of their advice because they obviously do not know their stuff. YOU CANNOT SPOT REDUCE, LADIES. I've also stumbled across one of Chloe Ting's videos on intermittent fasting, whereby she claimed that on IF (to lose weight) you need not count calories and can eat anything you want.

But the main reason on why I do not follow her workout videos is because like Emi Wong, many times her form isn't that great. And while she has tons of different videos on her channel, she tend to just shuffle through that same few exercises in all of them. 

Anyway, Phase 2 of our Circuit Breaker is confirmed to start this Friday, 19th June, and gyms will be allowed to reopen! Yayy! But since working from home is still a default, I will probably still be sticking to Holly Dolke and MrandMrsMuscle for my lunchtime workout for the time being. :)

Till then,
Mia Foo
Thursday, 11 June 2020

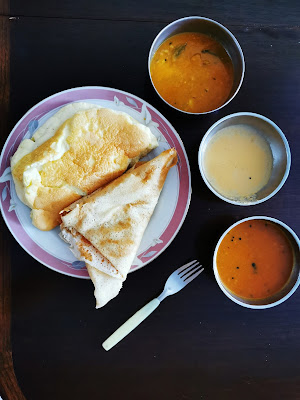
Mia Makes: Souffle Omelette (And I'm never gonna make it again)

 Recently there's this really IG-worthy looking, thick and fluffy omelette trend going on and so I thought, why not try it too?
And nope, I didn't make my own Thosai, so no recipe for that. 
And actually, you can't call this a recipe either because it's gonna be just eggs (how ever many you fancy) with salt and pepper. You won't be able to fill the souffle omelette with anything, but perhaps you can try with some grated cheese or herbs for added flavour if you really want to. 

So let's get over with the shortest ingredient list ever, so we can get started. To get a decent sized souffle omelette for 1, you'll need:
Eggs. 
(I used two, you can use three or even four if you're ravenously hungry)
Salt and pepper to taste.

So first up, separate your yolks and whites. Be careful to not have any traces of yolk (or oil, if you happen to be using a bowl that's greasy for your whites, it won't work) in your whites, if not they won't whisk up. 
Using a electric whisk, or a balloon whisk if you're ready to spend some elbow grease, beat up your egg whites on medium until they fluff up into (nearly) stiff peaks. 
Then, add in your desired seasonings into your yolks and beat for a few seconds to combine before folding the yolks and whites together lightly. Do so by first tempering the yolk mixture with 1/4 to 1/3 of the beaten egg whites (you can stir lightly to mix at this point) until homogenous before folding in the rest of the whites. I actually prefer folding the batter using a balloon whisk as I find that it requires much less folding as compared to using a spatula, but you do you. 

Then, pour all the batter into a suitable sized non-stick pan that's lightly greased and cook on low heat with the lid on until the bottom has turned golden brown and the surface has set. You may sprinkle some grated cheese or chopped herbs over the top of the omelette at this point, if desired. Then, carefully flip the omelette in half. 
I'm not that keen on having my souffle omelette too raw and runny in the middle, hence I flipped mine and "steamed" them for a few more minutes with the lid on for the interior to cook further. But if you want a runny, creamy interior, you can also slide the omelette off your pan and flip it in half directly onto your serving plate. 

Looks so pretty, doesn't it? But I will never ever make it again. HAHA!

The texture of this souffle omelette is unbelievably light and airy, like I was eating nothing. Not only that, the eggy flavour of a normal omelette was also thinned out possibly due to the excessive volume created by beating air into the whites, that I was also tasting nothing

So well, try this if you're eating for the Gram; not if you're eating for satisfaction. 

Till then,
Mia Foo


Monday, 8 June 2020

Mia Makes: Candied Sweet Potatoes

My first taste of candied sweet potatoes was at a local Korean restaurant (was it Bibigo?) many years back. Being a sweet potato lover with a sweet tooth, seeing candied sweet potato on the menu simply means I need to order it. And I was so glad I did! 
The sweet potato chunks were fried till crispy at the edges, but still moist and fluffy on the insides. And then every piece of the sweet potatoes were just fully coated in a thin layer of sugar syrup that's melted, sticky and a little gooey. OMG, it was like the best snack, ever. 
Ultimately there's many variations to the candied sweet potatoes. In Korea, they're called Goguma Mattang. In Japan, they're Daigaku Imo. And then there's also 拔丝地瓜, whereby instead of leaving the sugar syrup coating to cool down and harden as it is, you gotta stir up the sweet potatoes while the sugar syrup coating is cooling down to create the sugar strands/webs. 

But it doesn't matter where the deep fried sweet potatoes meet the sugar syrup, it'll always end up in a happy ending. HAHAHA!


So let's get over with the ingredients to get started.
For 1 medium sweet potato (180 - 200g), you'll need:
2 tbsp sugar (white or brown sugar are both okay)
1/2 tbsp cooking oil
a dash of soy sauce (may omit)
toasted sesame seeds (as topping, may omit)
More cooking oil for frying
recipe adapted from Ochikeron

First up, wash and clean your sweet potato. I typically scrub them down with a soft brush to get into all the nooks and cranny, as I prefer to eat them with skin on. You may peel the skin if you prefer to eat your sweet potatoes without the skin. After washing the sweet potato, cut them up into bite size chunks and immerse them in a bowl of water for about 10 to 15 minutes to remove excess starch.
After 15 minutes, drain the sweet potato chunks and pat them dry with kitchen towel, to prevent oil from splattering during frying. 

Then, place your sweet potato chunks in your frying pan and add sufficient cooking oil to cover the entire base of the pan, such that the base of every piece of the sweet potato chunks is sitting on the oil. We're not deep frying the sweet potato chunks, so you need not use a whole load of cooking oil. Then, turn on the hob to medium heat and let the sweet potato steam-fry with the lid on for about 3 to 5 minutes, until the surface is browned. Then, flip the sweet potato chunks over and steam-fry them again with the lid on for another 3 minutes. Continue flipping and steam-frying until the sweet potatoes are fully cooked. You can check the doneness by either inserting a bamboo skewer or simply poking them lightly with a fork. 
Then, remove the sweet potato chunks from the pan and drain off all the oil. Place the pan back onto medium/low heat and add in the 2 tbsp of sugar. Drizzle 1/2 tbsp of cooking oil over the sugar and leave it until the sugar crystals has just started to melt. Then, turn down the hob to the lowest heat and let it continue to cook. Do not stir the sugar-oil mixture at this point, just swirl them around lightly by tilting your pan around, until all the sugar crystals has fully melted. Then, add in the sweet potato chunks and soy sauce and stir-fry until the sweet potato chunks are evenly coated with the sugar syrup. Sprinkle in the toasted sesame seeds and give it a few toss to incorporate before turning off the hob and removing the sugar coated sweet potato chunks from the pan and onto a serving dish. 
Do take note to place them separately on the plate, or else they'll all stick together when the sugar syrup has cooled down and harden.

Tadaa~

As the sweet potatoes are steam-fried (and not deep fried), you'll get the crispy edges with a soft and fluffy interior, which is sooooooooooo good!
Needless to say, the plate was wiped out in mere minutes because it was so addictive. 

Till then,
Mia Foo


Thursday, 4 June 2020

Enjoy yummy crabs & more at home with 8 Crabs [Sponsored]

Do you love eating crabs but absolutely hate to eat it in public and end up with a glorious oily mess on your hands? Craving for some legit zichar dishes now, but finding it a chore to put on your mask and heading out to dabao (takeaway) while maintaining social distancing etiquette? 

Guess what, with 8 Crabs, now you can easily get to enjoy your favourite crab dishes (be it black pepper, chilli or salted egg) along with other yummy zichar favourites at the comfort of your home!

Just a few clicks of my mouse and I have 3 of my favourite zichar dishes delivered to my doorsteps, freshly cooked and still warm! 

Award-Winning Chilli Crab (Large, 750g) - $68 
Using only premium Sri Lankan wild caught crabs and stir fried to perfection with their award-winning recipe to achieve a gravy of the perfect blend between sweet, savoury and spicy. 

Do you know, crabs naturally travel about 500m every night and prefer to live alone. However, crab farmers breed many crabs in a confined space for profitability, causing the crabs to get stressed very easily while in captivity, as many farms cannot replicate their natural habitat. When stressed, crabs produce ammonia, which is a sign of decomposition of seafood. Hence, to cover up the distinctive ammonia smell in farmed crabs, restaurants will need to use highly fragrant gravies. 
8 Crabs is the only company in Singapore using grade AAA premium Sri Lankan sourced wild caught crabs, graded by the most experienced crab graders in the trade, while most restaurants tend to purchase farmed crabs due to their cheaper pricing. This simply means that the crabs at 8 Crabs are meatier, tastier, bigger, and less watery.
In addition, to ensure freshness, these crabs are caught, flown, prepared and delivered to customers within 12 hours. Not only does 8 Crabs have their award-winning chefs prepare the cook the fresh crabs daily to guarantee the best flavour and taste, they also have a one driver to an order policy across their 12 kitchens island-wide in order to uphold their promise of One Hour Crab Delivery. 

I'm not the biggest fan of chilli crabs (I prefer black pepper crabs) because it's so easy to get a badly done one that only gets you wondering, "is this chilli crab or egg-ketchup crab?"
But I decided to take the leap of faith and believe in their award-winning recipe, and I'm so glad I did! While they're not super spicy to give you that spicy kick of shiokness that makes you break out into a sweat, it was just the perfect blend of sweet, savoury and spicy that will probably make you want to just slurp the gravy like it's soup. 
The Sri Lankan wild caught crab is premium indeed. Their flesh so plump and succulent, and tasted fresh and sweet. But to be honest, I'm satisfied with just having the gravy and fried mantou. And my mum and I loved the gravy so much that we kept the leftover gravy in the fridge to add to our lunch the next day (I made chilli crab baked fish). 
HAHAHA!

Signature Coffee Pork Ribs (Large) - $28

Was expected pork ribs, but somehow we were given slices of pork tenderloins instead. Not complaining though, because the meat was still super tender and it's so much easier to eat without the bones. 
If you're a coffee fiend like me, then you absolutely got to try this. The coffee fragrance is strong, but not overpowering. I'm not a huge fan of pork in general, but the meat was so tender and the savoury flavour, paired with the subtle coffee bitterness, was so addictive that I could easily finish the entire container by myself if not for the calories. 

Claypot Beancurd (Large) - $24

Tofu, my love! Initially, I did feel that $24 is a little too pricey for 'just tofu' but I found out that there're so many other ingredients in the dish!

Egg tofu, chinese cabbage, snow peas, cauliflower, broccoli, carrots and shrimps. How is it possible to get everything I enjoy eating in just one pot? Every ingredient just blends really well together and sits so well in the gravy, which made the soft egg tofu even silkier. YUMS!

So what are you waiting for? Check out what 8 Crabs has to offer HERE and get read to feast!

Till then,
Mia Foo

Monday, 1 June 2020

Mia Bakes: Nian Gao Egg Tart (Revisited)

A while back, I've made some Nian Gao Portuguese Egg Tart (recipe HERE) using frozen puff pastry that's super easy to make and tasted amazing. However, the biggest problem with using frozen puff pastry as the tart shells is that you need to eat them warm from the oven. If left to cool down for a couple of hours, or overnight, the tart base turns moist and soggy. My mum did try reheating the soggy tarts (left overnight) in the toaster oven, but it only harden them up instead of crisping them back. 

So in order to get a batch of nian gao egg tarts that can retain their taste and quality for at least overnight, and won't kill me at the stage of preparing the tart dough (because enclosed kitchen with NO aircon in the house is a big no-no for trying to work with cold butter, it'll never work), I decided to try out the Hongkong style egg tart kind of tart shells instead! 

So let's get over with the ingredients, so we can get started!
To get 6 - 8 egg tarts, depending on the size of your mould and how thick you prefer your tart crust to be, you'll need:

For the tart crust:
175g all purpose (plain) flour
100g salted butter (soften at room temperature)
25g icing sugar
10-15ml cold water
you can also use unsalted butter and add a generous pinch of salt

For the egg custard:
1 whole egg + 1 egg yolk
30g castor sugar
160ml milk
60ml heavy cream

Filling:
(CNY) Brown Sugar Nian Gao, cut to size to fit to the base of your tart moulds and sliced thinly, to your preference. 

Recipe adapted from 饮食地图

I made 6 tarts using my muffin tin, and my tarts were ridiculously thick, I should have made 8 tarts instead. You'll also have extra egg custard left over, which I added a tbsp of unsweeten cocoa powder and a handful of semi sweet chocolate chips in, heat it over small fire to get all the chocolate chips melted before baking them in 4 silicon muffin cups along with the egg tarts to get baked chocolate custard. YUMS!

To get the tart dough, mix the soften butter with icing sugar until fully incorporated before mixing in the flour. It'll be much easier to "knead" the flour in with your hands instead of using a spatula as it'll be easier to gauge how much more cold water you'll need to add in. Start with just 10ml and see if your dough is moist enough to hold up, and add more from there. Depending on your flour hydration, you may need even more than just 15ml. 

So once the dough has come together, you can shape it into a disc and wrap it up with clingwrap before popping it into the fridge for at least 1 hour to firm up if you have a rolling pin and an XL round cookie-cutter that's big enough to cut out pieces of round dough that fits exactly into your moulds. 
As I do not have a cutter that's big enough, I will be pressing the dough directly into my moulds using my hands. Hence, I just shaped my dough into a log instead, whereby I can easily slice them into 6 (or 8) equal pieces after an hour's of rest in the fridge. 

So after the dough has firmed up, you can either roll it out into about slightly less than half a centimetre thick (they will puff up when baked) and cut out large circles that fits into your moulds. Otherwise, divide the dough into 6 (or 8) equal pieces and just use your hands to press down the dough balls into your moulds and shape them nicely up the sides into a tart shell. This will probably take some time and quite a lot of patience. 
Do remember to find something (a shot glass or something) to press down on the base of the tarts such that it won't be too thick. I've done so, but my tart base still came out super thick, hence I really should have made 8 tarts instead of 6. 

See that thickness? My tart base was as thick as my filling. T.T

So once the tart shells are done, set them back in the fridge while you mix the egg custard mixture. In a clean bowl, crack in the egg and add in the egg yolk and give it a quick whisk to break the yolks. Then, add in the sugar and mix until the sugar has dissolved before mixing in the milk and heavy cream. 

Then, get your tart shells out from the fridge and start assembling! First add in your sliced nian gao into the moulds before filling them up to nearly the top (about 90% or slightly more) and then baking them at 190 degree Celsius for 20 to 25 minutes (until your tart shells are browned) if you prefer your egg tarts the Hongkong styled. 
I wanted to brown my egg custard as well (like Portuguese styled) and so I baked mine at 225 degree Celsius (but take note my convection oven is EXTREMELY weak, I needed 40 minutes at 250 degree Celsius to burn my basque cheesecake) for about 30 minutes instead. 

Tadaa~

Apart from the tart base that's way too thick and left me with barely any filling, it actually still tasted pretty good! The tart shell was crumbly and buttery, and the brown sugar nian gao really complements the egg custard really well! 
And even after leaving the tarts overnight, the tart shell won't turn soggy like those frozen puff pastry tarts, yayy!

Till then,
Mia Foo