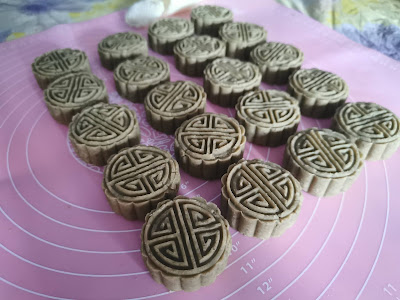
挑战过了桂花糕,下一个就是你了 - 绿豆糕!
(After succeeding the Osmanthus Rice Cake, the next one shall be you - Mung Bean Cake!)
Initally, I bought a set of the mooncake press-mould, thinking that perhaps I can have a try at making my own fusion mooncakes (eg. baked mooncake skin but with pineapple cake filling) this year, but the procrastination...
Oh well, Mid-Autumn is long over, so let's make Mung Bean Cakes instead!
For 20 (33 - 35g) cakes, you'll need:
250g mung beans (dry, with skin)
35g unsalted butter
50g Gavia Sweetener (1:1 sugar replacement)
20g honey
15g full cream milk powder
a pinch of salt
(and ALOT of elbow grease)
recipe adapted from Amanda Tastes
The procedures to make this cake is really simple, just that you'll require a lot of elbow grease frying the mung bean puree into the cooked dough. But anyhow, let's get started!
To 250g of mung beans, add in some water to soak the beans for at least an hour or two, until the beans has expanded in size. Then, give the beans a good rinse and pour them into a pot. Add enough water just that all the beans are covered, and bring the water to a boil over high heat on the hob. Then, turn off the hob and leave the beans to "steam" in the covered pot for 15 to 20 minutes, before adding some more water (if it has dried up) and repeating the process (of heating until the water boils, turning off the heat, steaming the beans in the covered pot) for another 2 times, until the beans are thoroughly cooked through and soft. This trick will save you a lot of gas (or electricity, if you're using induction hob) and possibly some cooking time as well.
Do remember to not add too much water (just enough to cover the beans) while boiling them, if not your puree will end up extremely watery and you'll need longer frying time later on to reduce the puree into a dough.
Pour the cooked beans and the remaining water into your food processor or blender, and blend into a fine puree. Do blend the beans for a while longer so as to better break down the skin. Otherwise, you can also remove the skin before cooking to get a smoother, finer cake texture.
Then, pass the puree over a sieve and directly into a non-stick pan. You may also skip the sifting part if you do not mind a coarser mouth-feel in your cake. Also, if you've already removed the skin before cooking, sifting is also not required.
To the puree, add in the butter, sugar, honey, milk powder and a pinch of salt. Then, start stirring the mixture NON-STOP over medium heat until most of the moisture in the puree has evaporated and the mixture will start to come together into a dough.
Now, how long more to cook the mixture once they start to come together depends on how dry/moist you prefer your cake to be. But do note that if your dough is too moist, it's harder for the cake to take the shape of your mould, and if it's too dry, they'll crack easily.
Transfer the hot dough into a clean bowl and cover with a cling wrap. Make sure that the cling wrap is touching the surface of the dough to prevent it from drying out. Then, leave it to cool/chill in the fridge. Once the dough has cooled down, it's time to start shaping! First, divide your dough into equal portion sizes and roll them into balls. You can do this by first weighing the total weight of your dough and dividing it by how many pieces you wish to get. Just make sure that the size of your dough ball doesn't exceed the capacity of your mould press (mine is a 50g mooncake mould press).
Then, oil your mould press to prevent sticking, and start pressing away!
Tadaa~
I'll probably increase the amount of sugar the next time I attempt this, as this batch has an extremely obvious "low-sugar" taste. HAHAHA!
Taste wise, due to the very subtle sweetness, the mung bean flavour is very prominent. My dad actually asked that I try covering some in flour batter and deep-fry them, saying it'll taste just like Kuih Kasturi (the mung bean fritters selling at most Goreng Pisang stalls).
HAHAHA!
Till then,
Mia Foo


0 comments:
Post a Comment