MollyMia Aspire to Inspire before we Expire
Showing posts with label baked cheesecake. Show all posts

Sunday, 15 November 2020

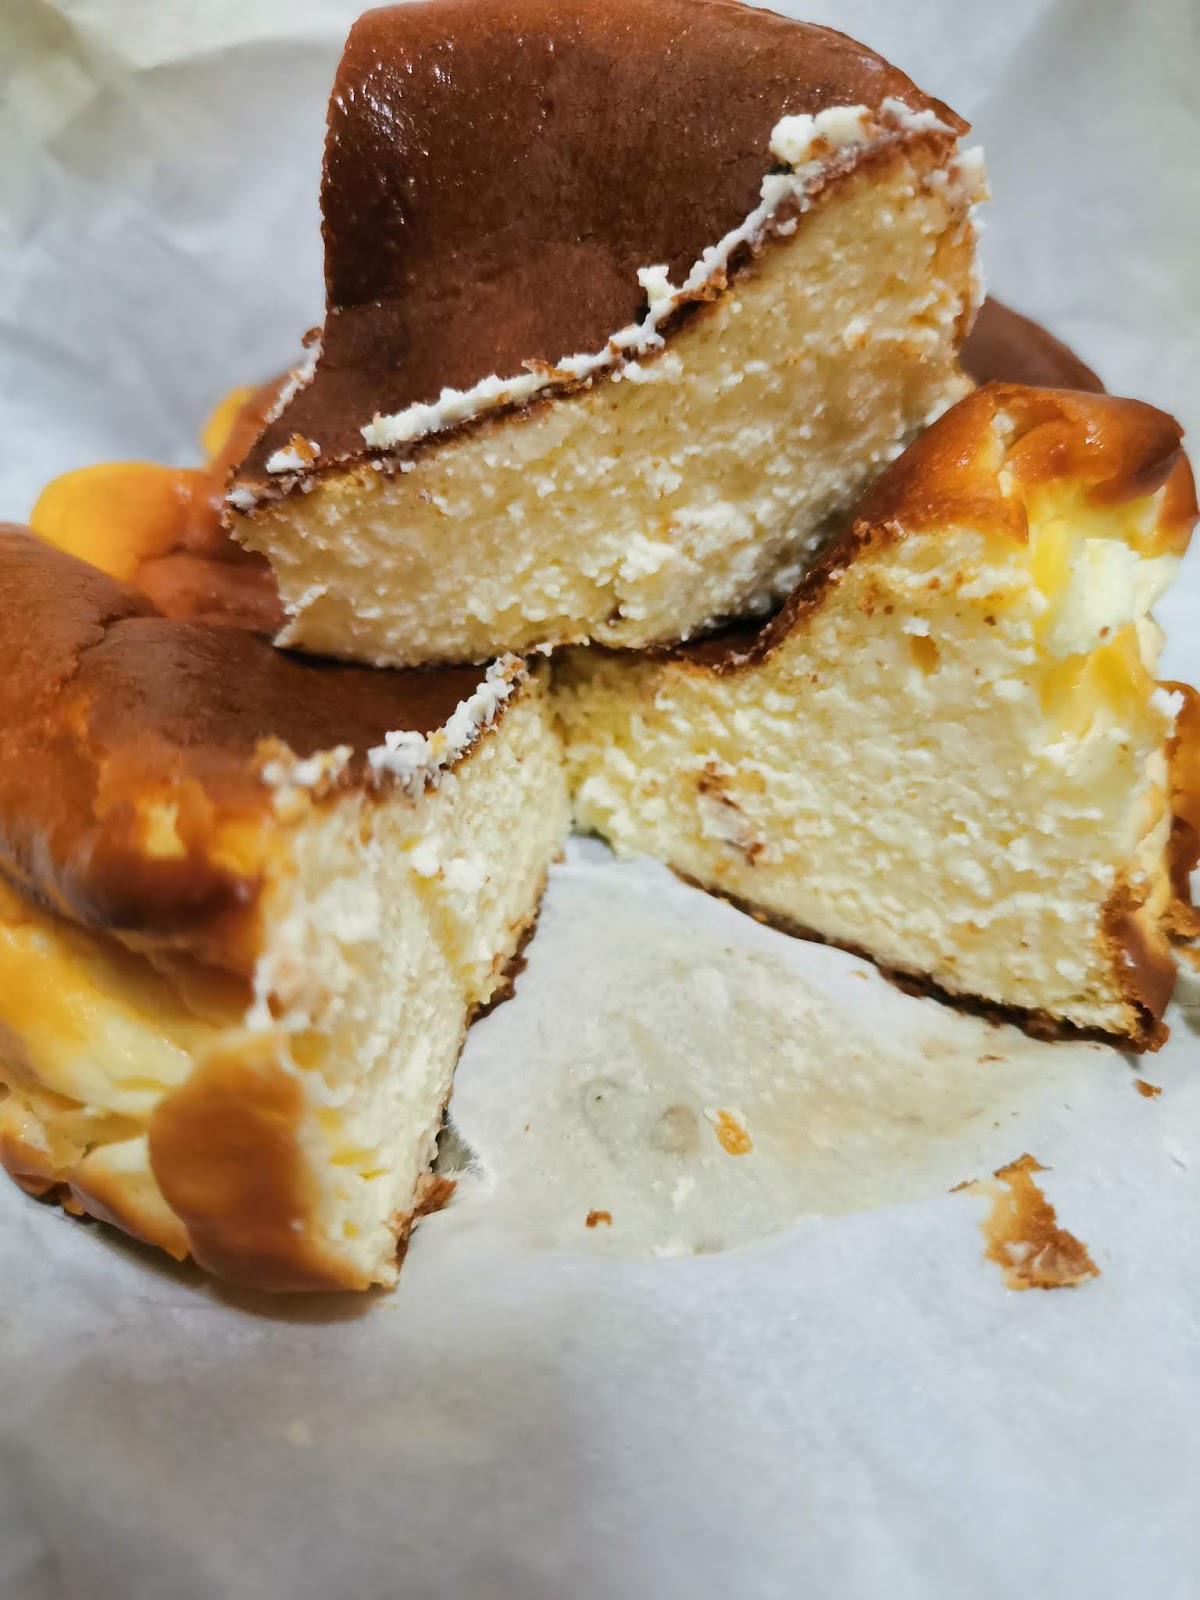
Mia Bakes: Cottage Cheese Torte (Low Calorie Baked Cheesecake)

 Previously, I've posted a recipe for Ricotta Burnt Cheesecake and was so glad to have found a lower calorie, diet-friendly and yet equally yummy cheesecake. 
And now, I found cottage cheese!

Do you know, 100g of cream cheese packs 342 kcals, while ricotta holds 174 kcal and cottage cheese has barely 100 kcals? And if they're all going to end up tasting equally good, why waste that 3x calories for the same enjoyment, right? 


Goodbye, cream cheese. I won't see you to the door.


Anyway, let's get over with the ingredients, so we can get started!

For a (roughly) 20 x 10 cm loaf pan, you'll need:

For the filling:
200g cottage cheese
2 eggs, separated.
12g plain flour
75g baking sugar replacement
(you can replace with castor sugar in 1:1 ratio)
90g cooking (or heavy) cream
1 tbsp lemon juice
(you may add in grated peel of the whole lemon if you wish)
a pinch of salt
1/2 tsp vanilla extract
1/8 tsp cream of tartar (optional, for meringue)

For the crust (optional):
70g (or more, if you like a thick crust) biscuit of your choice.
(I've used Britannia Good Day Cashew Cookies, but you can use digestives or even lotus biscuits) 
1 tbsp butter (or more, depending on your biscuit)


First up, place all your cookies and 1 tbsp of soften (or melted) butter into a small food processor and process until everything has come together and the consistency resembles wet sand. If the crumbs are unable to hold its shape when pressed together, add a little more butter (or you may replace with lower-fat options like greek yogurt or unsweetened applesauce) until you get to a malleable texture. If you do not have a small food processor, feel free to do this step in a ziplock bag with a rolling pin instead.

Pour the buttered crumbs into your loaf pan, lined with parchment paper and pat it down firmly to form the crust base. Pop it into the oven to bake at 180 degrees Celsius for 5 minutes for the base to somewhat firm up before removing the pan from the oven to cool down slightly while preparing the rest of the ingredients. 

In a large clean bowl, add your separated egg whites and give it a quick whisk with your handheld mixer (or stand mixer, if you have one) to loosen it up. Using a clean spoon (no traces of oil here, as it'll prevent your whites from getting whisked up into meringue), take out a small spoonful (I'll say about half a tablespoonful will suffice) of the whites in a small dish and set everything aside. In another clean bowl, add in your cottage cheese and give it a good beating mixing with your handheld mixer (or balloon whisk, if you're up for spending some elbow grease) until the big curds have more of less broken down into tiny pieces. Then, add in the cream and continue mixing until the mixture has turned considerably smoother. It'll be impossible to beat them into cream cheese consistency, just make sure that there's no more huge lumps of cheese floating around in the mixture and you'll be fine. Then, add in the egg yolks, 1/4 of the sugar, lemon juice (and grated peel), vanilla extract and salt. Whisk until well combined before adding in the flour. Mix until there's no more dry pockets of flour and set the mixture aside. Wash your handheld mixer whisks CLEAN before proceeding. 

Check if your crust base has cooled down before brushing on the 1/2 tbsp of beaten egg whites over the top of the base with a pastry brush lightly. Then, set the pan back into the oven to bake for another 5 minutes (or until you start smelling a nice buttery fragrance from the baked base). Remove from the oven and set aside to cool down. Turn the oven temperature down to 175 degrees Celsius. 

Then, with CLEAN whisk attachments on your handheld mixer, whisk the remaining of your egg whites until frothy before adding in the cream of tartar (optional) and 1/3 of the remaining sugar. Continue whisking and adding rest of the sugar in another 2 additions, whisking thoroughly after each additions. Continue beating the egg whites until stiff peaks formed. 

With a spatula, scoop 1/3 of the meringue and fold it into the cheese-yolk mixture. Then, pour the mixture back into the rest of the meringue and fold lightly (either with a spatula or you can also use a balloon whisk, but mix with a FOLDING technique) until just combined. Do not overmix, or you'll risk deflating your meringue. Pour the fluffy mixture into the loaf pan, over your pre-baked crust and bake at 175 degrees Celsius (reduce by 10 degrees if on fan) for around 25 minutes, or until the top of the torte is evenly browned, and the top springs back slightly when tapped lightly with a finger and the centre jiggles slightly when shaken. If you'll prefer a "fairer" cheesecake (I personally like how the charred/caramelised flavour of the browned top cuts into the otherwise cloying heaviness of a cheesecake) with a sinful creamy mouthfeel, feel free to lower your temperature to 160 degrees Celsius and bake the torte in a hot water bath for much longer (35 to 40 minutes)

After the torte is done, leave it in the oven, door closed, for another 15 minutes before leaving the oven door slightly ajar and allowing the torte to cool down in the oven for at least another 30 minutes. When the torte has cooled down to room temperature (or just slightly warm to touch), cover the top of the torte with clingwrap and pop the entire thing (parchment paper, loaf pan and all) into the fridge for at least 4 to 6 hours before serving. 


The torte will puff up slightly while baking, and the top will shrink back to flatten back out when cooled. But it shouldn't crack, and should stay relatively flat (instead of ending up with a depression in the centre) if you've allowed the torte to cool down slowly in the warm oven. 

I love how the centre of the torte remains slightly molten, yet not alarmingly runny. Due to brushing the top of the pre-baked crust with beaten egg whites, which formed a "waterproof" layer between the moist cheese filling and the baked crust, it allows the crust base to stay crisp instead of turning soggy. The overall texture of the torte, though definitely not fluffy like Japanese cotton cheesecake, is still a lot lighter and fluffier than a typical (cream cheese) baked cheesecake without beating the egg whites separately into meringue. Flavour wise, it's also much lighter (cottage cheese are supposed to be less sweet than cream cheese) and a lot less surfeiting. 
I guess, I've nailed THE recipe to follow for a baked cheesecake for myself!

Till then,
Mia Foo 

Wednesday, 1 January 2020

Mia Bakes: Burnt Basque Cheesecake

Yes, after contemplating about it for so so so long (I first came across a youtube video of this cake waayyy before it started appearing in our local cafes/bakeries, and had wanted to try it back then) I finally tried it. 

The (once very) trendy Burnt Basque Cheesecake, which ended up being more golden then burnt. 
But anyway, let's get over with the ingredients to get started!

To get 1 small 5' - 6' cake, you'll need:

227g cream cheese, soften
(I used Cowhead, if you're using Philadelphia then 250g is fine too) 
45g sugar 
(I mixed 15g stevia and 15g icing sugar) 
1 tbsp honey
100ml whipping cream
2 medium eggs
10g all purpose flour

First up, pre-heat your oven to 220 degree Celsius. It's very important that you pre-heat your oven first because of the higher than usual temperature you need to get, plus it takes literally just minutes to put your cake batter together. If you're quick enough, you might even finish the batter before your oven is pre-heated! >.<
Anyway, after getting the oven out of the way, line your cake pan with a piece of parchment paper. There's no need to line it to size, but just roughly push a square/rectangular sheet of parchment into your pan and let the edges fold onto itself at the sides of the cakepan.

Do keep around 3' of overhang upright (shown in picture)  to 'catch' the cake as it rises in the oven during baking.

Now, making this cheesecake can't get any easier, and you can easily make it in 1 bowl.
First up, beat your soften cream cheese in a large bowl to loosen it up before beating in the sugar until well combined. Then beat in the eggs, one at a time, until the mixture is well combined.
To the mixture, add in the honey and whipping cream and mix again before finally adding in the flour and mixing until you get a homogeneous mixture.
Pour the mixture into your lined cake pan and let it bake in the oven at 220 degree Celsius for 10 minutes, before reducing the temperature to around 200 degree Celsius and bake until the surface of the cake is browned/burnt to your liking.

After the cake is done, leave the door of your oven ajar and allow the cake to cool completely before letting it chill in the fridge overnight (or at least 4 hours) for the cake to set.
Do take the cake out from the fridge and allow it to come up to room temperature before eating though. 
Tadaa~ 

Rich and creamy with a slightly caramelised taste at the "burnt" edges, it's no wonder there's so much hype for this cake! 
If you're after the molten, lava centre effect, perhaps you can tuck into the cake once it's cooled and without chilling in the fridge, but don't quote me for this as I've not tried it. 
And I don't really understand why would you want a molten centre for this cake either, this is no cheese tart nor chocolate cake. 

edit: I've made a lower calorie version (and added biscuit base) using Ricotta HERE

Till then,
Mia Foo


Sunday, 24 March 2019

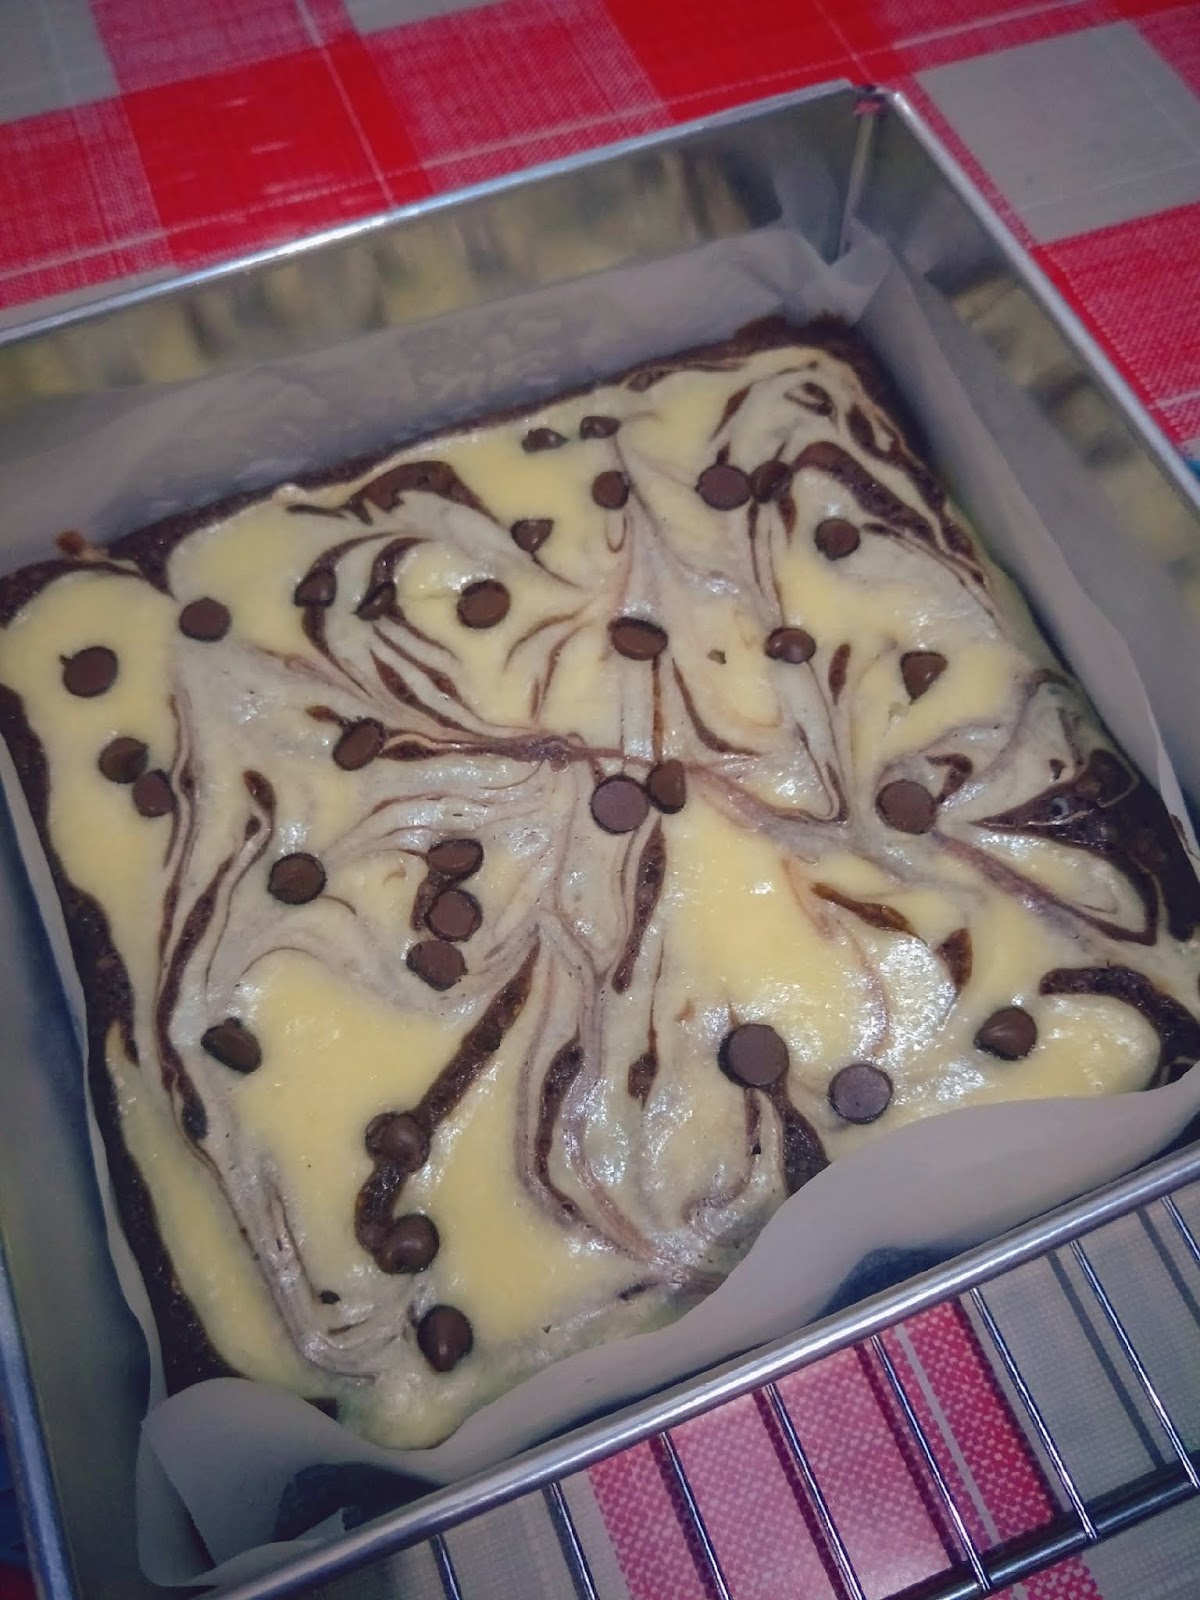
Mia Bakes: Cheesecake Brownie

Wow, it's been quite a while, people! I know I should be continuing with my New Zealand travelogue, but it's really hard trying to organise the thousand over photographs taken with 3+1 devices. Just... give it a little more time, yeah?
Well, frankly speaking I've been baking a lot less too. I've been a little bit busy with some other commitment, and perhaps I will blog about that in time to come.
But let's get back to baking, shall we? This time, it's a really simple "two-bowls" recipe by mashing up two extremely no-brainer one-bowl recipes together.
Cheesecake Brownies!

Let's get over the ingredients so we can get started!

For the cheesecake:
250g cream cheese, soften
(block cream cheese, not the spread) 
50g castor sugar
1 egg

For the brownie:
1 bag of Betty Crocker Fudge Pouch Brownie Mix
75g semi-sweet chocolate chips
1 egg
2 tbsp strong coffee
75g melted butter
I heated up 85g of unsalted butter and let it simmer down to 75g, which made it slightly browned and more flavourful

In a clean bowl, beat the soften cream cheese with sugar until well combined. Add in the egg and mix further until smooth and set aside.
In another clean bowl, pour in the brownie mix along with egg, strong coffee and melted butter and mix until just combined. Throw in the chocolate chips and give it a couple of folds to distribute it evenly in the batter.

Line your 8x8 baking pan with baking paper and spray it down with some cooking spray so nothing sticks. Pour in the brownie batter and even it out with a spatula. Then, using a spoon, drop dollops of the cheesecake batter on top of the brownie batter. With a chopstick, give the mixture a few swirls to marble up the two batters. Tap the pan on the counter to even out the surface. You may add a bit more chocolate chips on top of the cheesecake batter if you fancy.

Send the cheesecake brownie to bake in the oven that's pre-heated to 175 degree Celsius for about 25 minutes. You may want to start checking for the doneness with a toothpick at 20 minutes, especially if you want your brownie to be fudgey instead of being cakey. If a fudgey brownie is what you're looking for, your toothpick should have a few wet crumbs on it. At this point, also check for the doneness of the cheesecake by lightly pressing down on the surface to make sure that it has "set".

Take the pan out of the oven and wait for it to cool down slightly for around 10 minutes before attempting to lift the entire brownie out of the pan. Then, leave it on a wire rack to cool COMPLETELY before cutting into it.

If you would love a more marbled looking effect, I suggest you can alternate the brownie and cheesecake batter layers into 4 layers such that you can get some cheesecake right in the middle of the brownie layer as well. 

I know, Betty Crocker brownie mix isn't the best tasting ones you can find, but by switching up the water and oil with strong coffee and melted butter, along with a handful of chocolate chips really do make a difference. The coffee brought out the richness of the chocolate and the (browned) butter added a lot more decadent flavour to the brownie.
TRY IT!

Till then,
Mia Foo

Tuesday, 20 March 2018

Mia Bakes: Biscoff Baked Cheesecakes

Very recently, I got a taste of Bloomsbury Bakers' speculoos cheesecake (thanks to CL!) and it was so good! Well, coming from someone who doesn't really like cheesecakes (especially no bake cheesecakes), this can only mean that it was absolutely divine! I mean, how can you go wrong with speculoos, right?
And so, the ever-so-gluttony me decided to try recreating my own version of the speculoos cheesecake!


So let's get over the ingredients, so we can get started!

You'll need:

For the cookie base
15 pcs of biscoff cookies
5 pcs of butter cookies
(I used tiger original bisuits because I wanted to use them up)
30g unsalted butter, melted
a pinch of salt

For the filling
200g cream cheese, soften
1 egg
1/4 tsp vanilla extract
60ml whipping cream
15g plain greek yogurt
60g biscoff spread
(I used crunchy, but you can use smooth and add more crushed biscoff)
a pinch of salt
5 pcs of biscoff cookies, lightly crushed

recipe adapted from delish.com

First up, fill your oven's baking tray with water (enough to cover up to half the depth of your muffin tin) and pre-heat it to 160 degrees celsius (or 325 degrees fahrenheit).

Next, to prepare the cookie base, pop the biscuits into a ziplock bag and crush them well using a rolling pin. Add in melted butter and salt, and toss them until the consistency resembles wet sand. It should hold together when you apply pressure, so if they don't, just add more melted butter.
Evenly distribute the cookie mixture into 12 standard size muffin/cupcake tins and press them down until they're evened out and well compacted and set them aside.
As you can see, instead of 12 standard cupcakes, I've made 6 standard + 12 mini instead.
That'll work too.

In a clean bowl, beat the cream cheese with a handheld mixer or a balloon whisk to loosen it up before beating in an egg and vanilla extract until well combined. Then, mix in the whipping cream and greek yogurt until well combined before mixing in the biscoff spread. Finally, fold in the crushed biscoff cookies and you're ready to assemble!

Evenly distribute the filling into the 12 muffin tins with cookie base. You may crush up more biscoff cookies and sprinkle them over the top of your cream cheese filling before sending them into the oven and bake for 20 to 25 minutes. Check if your cheesecakes are done by lightly pressing down on the surface and if it holds up (doesn't matter if it's slightly jiggly), it's done!


I've decided to do without anymore added sugar as the biscoff spread is sweet enough for me. However, if you'll prefer a sweeter baked cheesecake, you may add more biscoff spread or beat in a tbsp or two of castor sugar into the cream cheese before adding the egg and vanilla extract. :)

Just like any other baked cheesecakes, these yummies should be chilled at least a few hours (or preferably overnight) in the fridge before you sink your teeth into one! 

Till then,
Mia Foo

Saturday, 15 July 2017

Mia's Recipe: Baked Oreo Cottage Cheese Cake

Well, I'm personally not a fan of cheesecakes in general (but I do enjoy eating those Hokkaido baked cheese tarts) but since it's the BF's birthday and the boy loves cheesecakes, I decided to bake some healthier options of cheesecake for him.
But well, in the end I still dumped in tons of Oreo cookies, so it wasn't that healthy after all. But hey, it's his birthday, we should both indulge. HEH!


To make these baked oreo cottage cheesecake (serves 18), you'll need:

15 pieces Oreo Cookies
200g Cottage Cheese (I've used 97% fat free)
25g plain Greek Yoghurt (I've used low fat)
25g melted butter
30ml honey
1 tbsp baking stevia 
(you may omit stevia and use a total of 45ml honey)
2 medium eggs
20g cake flour (or top flour)
18 pieces Mini Oreo Bites

First up, separate the cream filling and biscuits of the oreo cookies. Divide the filling into half (I got about 16g separated out) and crush up half the filling along with the biscuits in a food processor, along with the melted butter.
Your crushed oreo mixture should be of wet sand consistency. 
Pack the crushed oreo mixture into the bottom of your tin (I got both of mine from Daiso). I got about 2:1 cake to base ratio, but you can tweak the thickness as you wish. Perhaps just pack all into 1 tin if you're those type who loves a thick base crust. 

Then, back at the (clean) food processor, add in all the ingredients except for cake flour and blitz until you get a smooth mixture. Pour the mixture into a large bowl and fold in the sifted flour with a balloon whisk. 

Pour your cheesecake mixture over the oreo base crust and top it up with mini oreo bites.

Send to bake for 25 to 30 minutes at 180 degree Celsius.


Wait till they're cooled completely before removing them from the tin and slicing them up. 


The insides were still moist and soft while the edges slightly crisp. I guess as compared to a cheesecake baked with cream cheese, using cottage cheese gives your cheesecake a rougher, grainy texture and also greatly reduce the calories per serving. 


If you're on a strict diet, you may do away with the oreo base to further reduce the calories and sugars per serving (53.9 calories, 3.6g sugars, 2.5g fat and 2.3g protein).

ENJOY!

Till then,
Mia Foo