MollyMia Aspire to Inspire before we Expire

Saturday, 24 September 2016

Mia's Recipe: Healthy 77 Calories Brownies

Yes, that's not a typo and your eyes aren't playing a trick on you. I'm going to share with you my recipe for a yummy, 77 calories brownie!


With no refined flour, no refined sugar, and no butter, this will be the perfect sweet treat for those watching your diet! Best of all, this doesn't taste healthy at all! 

To make your own 77 calories brownie (16 servings), you'll need:

1/2 cup unsweetened applesauce 
1/2 cup honey 
(you may reduce it if you prefer your brownies less sweet)
2 eggs
1/2 cup wholemeal flour
(I've used 1/4 wholemeal and 1/4 low-carb mix, else with 100% wholemeal you should be getting 75 calories brownies instead) 
1/2 cup unsweetened cocoa powder
1 tsp baking powder
1/4 tsp salt

optional: chocolate chips or chopped nuts of your choice
(but do note these aren't included in my calorie count) 

It can't be any simpler to make this yummy brownies. First, add all your wet ingredients (honey, applesauce, eggs) into a bowl and mix till combined. 
Then, sift in your dry ingredients (very important to sift, especially for cocoa powders as  they're always lumpy) and mix until just combined. 
You may fold in your additional chocolate chips or chopped nuts before pouring the batter into a greased (or non-stick) 8 x 8 inch square brownie pan, for an easy time cutting them into 2" squares so you can gauge your calorie intake better.
Bake at 180 degree Celsius for 20 minutes and check that a toothpick inserted in the middle comes out clean. 


Due to the wholemeal flour, the brownie will be slightly more crumbly but still stay soft and moist (due to the honey and applesauce). 
I find that even without the chocolate chips, I wouldn't mind having the brownie a little less sweet hence it's probably good to reduce another tbsp of honey from the recipe (to use about 100ml instead of 120ml) and to make up for the hydration level with some skimmed milk. 


Do share with me how yours turned out if you've tried this recipe as well. 

Edited: I've tried substituting butter with applesauce for breadmaking and it turned out quite terrible! Fellow bread-bakers, if you've ever successfully did a butter-applesauce replacement, do let me know how you did it!

To get the wholegrain and low-carb flour I've used for this recipe, hop over to iHerb right now! 

Till then,
Mia Foo


Wednesday, 21 September 2016

Mia's Recipe: Low Carb Multigrain Fruit Loaf

And so, after achieving a wholegrain (whole wheat, oatmeal) bread loaf, which is perfectly edible (my bread machine recipe HERE), my greed for something new set me going on a googling-youtubing craze again for a multigrain, possibly low carb bread recipe. 
But what came up were mostly just bread made with almond meal, which is extremely expensive and totally not sustainable for my lifestyle. 
Depending on the brand, you might need to cough up at least almost $18 SGD for a packet of almond meal that doesn't even give you 500g of the almond flour on iherb, and that's way too expensive even in the name of low-carbohydrates. Plus, having a bread loaf made mostly (or entirely, in terms of dry ingredients) from almonds actually means 1 thing. Yes, it's low in carbohydrates, but other than almond flour, you will still need to add in milk, butter (oil) and possibly eggs, which means, this is a low carb, but super high fat bread loaf! 

And so, while I was lamenting that a truly healthy low-carb bread loaf is not going to be possible, I came across this on iherb. 
Bob's Red Mill Low-Carb Baking Mix

It's not exactly the cheapest flour mix you can get on iherb (it still cost you almost $10 for this pack of 453g) but comparing this to using solely just almond meal? I'll choose this anytime. Plus, Bob's also does a low-carb bread mix so it can only get even easier for you if all you want is to make bread with it. 

The grains that went into this flour mix includes: wholegrain oat flour, oat bran, oat fiber, flaxseed meal, wholegrain rye flour, wheat bran & wholegrain soy flour. These ingredients gives you only 120 calories per serving of 30g, and 13 g carbohydrates with 5g fibre, hence giving you a net carbohydrate of only 8g per serving!

Using a mixture of this low carb flour blend and wholemeal flour, I decided to bake a loaf of multigrain fruit bread using my Mayer bread machine!

The ingredients you'll need are:

120g wholemeal AP flour
120g low-carb baking mix
15g oatmeal
200ml milk
30ml honey
35g unsalted butter
1/4 tsp salt
1/2 tsp baking powder
2 1/4 vital wheat gluten
1/2 - 1 tsp ceylon cinnamon
(you may add more if you like cinnamon flavour, I've started adding ceylon cinnamon to my bread mainly for its health benefits)
1 1/4 small mayer tsp instant yeast (about 4.5g)
your choice of dried fruits, amount is up to you.
(I used dried raisins and cherries)

Even though I've started using VWG, I'll still prefer to do a quick soak of the wholemeal flour in the milk for at least 30 minutes before I add in the rest of the ingredients (except butter and dried fruits) for mixing using the mix dough function. After which, I restarted the machine on multigrain function and add in butter during mixing.
Do keep a close check on the dough during mixing / 1st kneading. Add in more liquid or flour by the teaspoons if your dough is sandy (too dry) or mushy (too wet).
Dried fruits will be added in after the feeding point beep sounded on the machine. If your bread machine somehow do not have such a function, or you're making this by hand, add in the dried fruits during kneading after 1st proofing (before shaping & 2nd proofing).


Tadaa~ Here's my low-carb multigrain fruit loaf, which an acquaintance thought was panettone. 

Have you ever tried baking your own low-carb bread using a blend of flours that's lower in carbohydrates too? Do share your recipes with me in the comment board below!

To get the low-carb flour I've used for this recipe, hop over to iHerb right now!

Till then,
Mia Foo

Monday, 19 September 2016

Media Invite: Quan Fa Organic Farm

Being an eastie all my life (apart from my years in NTU), you can't blame me for not having ventured to the most ulu-north part of the island until now. And well, I had a really good reason for the long journey north.

It's a day of farm tour with Quan Fa Organic Farm! 

Just in case you get lost on your way there, they're located right opposite the first chicken coop of Chew's egg farm.
Do not let yourself be distracted by the chickens and overshoot, you'll end up in military restricted zone. Yeah, that was what happened to us. 

If you're wondering, Quan Fa has their vegetables organically grown and uses no pesticides or chemical fertilizers. And first, let's visit their sprouting area!

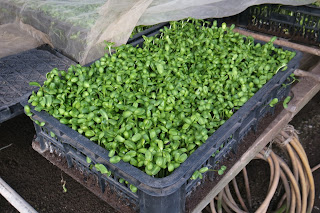
These are actually sunflower sprouts! Just pot them and give it a few more weeks (or months?) and you'll get some pretty sunflowers! 

But of course, why do that when you can eat these sprouts right away? Nutty and with a slight sweetness, these yummy little green things are good just directly off the rack (since they're organic, which means no pesticides)!

Next up, we were introduced to the radish sprouts, which wasn't really my cup of tea because they taste just like wasabi. 

It didn't help that they look so cute (like a 4 leaf clover) though. But for those weirdos who actually like the taste of wasabi, I reckon this will be right up your alley. Just throw a handful of these sprouts into your salad for a wholesome wasabi taste! 

And of course, you can't leave out the wheat grass, which is perfect for juicing.

And then, following the owner of the farm, JJ, we heading out to the 'plantation' area, which was like Jelly's heaven. 

Looking at this patch of lettuce goodness, I was reminded of the fairy tale Rapunzel. Don't ask me why, but perhaps these greens look so yummy that it fits why the wife will get the husband risk his life to steal the Rapunzel plant from the witch's garden for her. 
Hah, random moment here. My apologies. 

And guess what?


It's actually radish! Due to our climate, our locally grown radish are usually much smaller than those imported ones. But good thing is, Quan Fa sells their radish whole, together with the radish tops, hence you can enjoy both the root and the leafy parts together. Apparently, the radish top makes good soup!

And if you're a big fan of spring onions, you'll be glad to know that the spring onions grown at Quan Fa has a pretty strong, distinctive spring onion taste/fragrance. 
Well, once again, not my cup of tea. 

There's kale as well, easily recognised by the powdery white film on the surface, which is the plant's natural protective mechanism. 

And if you're wondering what's those random yellow flags doing among the greens, they're actually an adhesive tape used as insect traps. Upon closer look you can see many tiny insects stuck on them, so yup... no close up shots for you.

Other than just green vegetables, you can also expect to find other organically grown food during the farm tour such as the following:

Chili padi

Papayas

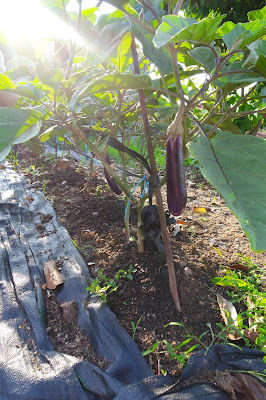
Brinjals

Mulberries

And mint!


And we ended off our farm tour with a curry plant that's as tall as a tree. Sorry for being ignorant, but I always thought curry plants grow like shrubs. 

To end off the farm tour, we were treated to some yummy cold brown rice ban mian and some super refreshing lemongrass drink sweetened with organic brown sugar. 

I love how they added in sunflower sprouts into the cold noodles. YUMS!

For more information on Quan Fa Organic Farm or to get some fresh organic vegetables online, visit their website HERE
To get 10% off your first purchase, enter QuanfaOrganicFarm at checkout. 
Do note that the discount code is not valid for promotional items and dried goods.

Till then,
Mia Foo

Monday, 12 September 2016

Mia's Recipe: Cinnamon Wholemeal Oatmeal Bread

If you didn't know, it's been almost 2 months since I embarked on an #eatclean diet (read about it HERE) and I've been avoiding refined carbohydrates ever since, apart from my cheat days. 
And so, I've thrown out all of my white flours (well, actually they expired in my cupboard) and replaced them with organic wholemeal flour and low-carb flour mix (mixture of wholegrain flours) and following the usual bread recipe and bread-making procedures using white flour, these were what I got.


Even though the bread loaf were still relatively soft, they were extremely short (as if my yeast weren't activated), dense and crumbly, like an over-mixed cake. 
After reading up on google, it turned out I either have to adopt the tedious overnight sponge dough method, or add in another ingredient to my recipe, the vital wheat gluten. 
And of course, being the lazy me, I chose the 2nd option. 

And so, here's my recipe for a yummy Cinnamon Wholemeal Oatmeal bread! 


Finally, I got my pretty dome shaped bread instead of the previous flat-tops. The loaf still turned out pretty short as I'm baking a <500g loaf with a 500g/750g bread loaf pan (Mayer Bread Machine). 

The ingredients you'll need are:
240g wholemeal flour
200ml milk
30ml honey 
35g oatmeal (I used quick-cook)
35g unsalted butter
3 tsp vital wheat gluten
(add 1.5 tsp for every cup of wholemeal flour)
1 tsp ceylon cinnamon
1/4 tsp salt
1/2 tsp baking powder
1 1/4 small mayer tsp instant yeast
(should be around 4.5g) 

First up, I added all the wholemeal flour and milk into the bread pan first, stir slightly and let it sit for 15 to 20 minutes. 
After which, I added in honey, yeast, salt, and vital wheat gluten and let it sit for another 10 minutes before I start the machine on mix dough function, which will mix and knead the dough for 25 minutes. 
After kneading, start the machine on wholegrain function (if you're using Mayer 12) and add in soften butter, oatmeal and cinnamon. 
Check the dough after everything is well mixed and add more liquid or flour by the teaspoons if required. 


Compared to a white loaf, a 100% wholemeal loaf is still much denser and heavier, but that's what you should expect from a 100% wholemeal bread. The loaf has a slight cinnamon-honey sweetness to it and if you're a fan of cinnamon, you should totally try this out!

To get the wholegrain flour and ceylon cinnamon I've used for this recipe, hop over to iHerb right now!

Till then,
Mia Foo

Tuesday, 6 September 2016

Mia's Review: Foot Medi Foot Peeling Spray

-credits to gaitway.com.au-

Do you know, cracked heels doesn't necessary just makes you look bad while strutting around in your killer (strappy, backless) heels, but also smell bad. The accumulation of old dead skin cells will eventually give you sticky and stinky feet as fungi and sebum tend to latch onto the dead cells. And these are hard to clean off with just regular washing. 

I've previously tried foot pumice (they really doesn't work much), foot files (mehh) and the once very popular pedi-egg, which by far is the most efficient, but it going to be a serious arms' workout as well. Recently, I came across a foot peeling spray on Qoo10 and decided to give it a try. 

Retailing at the usual price of $19.90 on Qoo10 (and as low as $7 on auction promo), this product came across as those skin exfoliating products we usually use on our faces. 


With a spray head that comes along with a lock function, usage is extremely simple. 


You just spray the product onto your feet generously, and wait for 20 seconds before rubbing. 


And expect all your dead skin cells to be exfoliated off! It's really quite a nice feeling rubbing out so many dead skin cells off my heavily callused feet. The product also comes with a nice citrus-orangey scent and can be used on either dry or wet feet, which means you can use it in the showers! How convenient!  


That's my (still very dry and quite cracky) feet after 1 usage of the product. 

Well, obviously this product is not some miracle dead skin peeling spray that will give you baby smooth feet in just one usage. However, I still feel that it's a good product to have if you are at the two most extremities of the spectrum: You have horribly cracked heels, or you have a decent looking pair of heels with moderately well moisturised and smooth skin. 

If you're well blessed to be the latter, then this spray will be perfect on its own as your weekly or bi-weekly foot peeling treatment to keep your feet as well-maintained. On the other hand, if you're not (like yours truly), then having a foot pumice/foot file/pedi egg alone will not be sufficient to remove callus mountain on your feet. 
I personally found my pedi egg experience right after using this foot spray much easier and quicker, with more dead skin shaved off much quicker and easier. 

You can purchase Foot Medi Foot Peeling Spray at Qoo10 right HERE

Till then,
Mia Foo


Friday, 2 September 2016

#fitnessfriday - Mia's sustainable #eatclean diet plan for weight loss (Part 2)

Previously in Part 1 of this #eatclean diet post, I've shared with you an extensive 21 days diet plan that's based on the idea of Weed-Seed-Feed detox diet, which has taken 3.4kg off my weighing scale.
And then you may ask, what's after the 21 days?

-credits to mqfactor.com-

To be honest, revert to your usual unhealthy
eating habits (eg. stuffing yourselves silly with sugar and fats) and you'll gain them all back in no time. But the idea of this #eatclean diet plan is, you shouldn't, because it takes us as short as 21 days to make or break a habit. Although.... well, some articles has debunk this myth and came up with a much longer time period of 66 days, but just for my case, these 21 days (compared with a significant results obtained to further fuel my motivation and belief in this diet plan) has worked wonders.

However, I still couldn't see myself on a diet that totally avoids refined carbohydrates and added sugar forever. There's also a risk of me losing the battle against my suppressed cravings and eventually losing it altogether. Hence, to keep my (probably) growing gluttony under control, I decided to add in a cheat day per week!

-credits to relatably.com-

And what's a better day than Sunday for some naughty indulgence? Well, it's also because Sundays are my sleep in days, so the craziest I can go is to have 2 full cheat meals instead of 3. 
Portion control, yeah? 
-credits to blitzyourbody.com-

A few pointers to know when adding in your cheat meals/cheat day are:

1. NO GUILT
Well, you've eaten clean for the past 6 days. I know, we don't rewards ourselves with food. We're not dogs. But heck, you earned the chance to satisfy your cravings. So savour it, and enjoy! If you're going to feel guilty after the indulgence, then you're totally missing the whole point of a cheat day.

2. PLAN YOUR INDULGENCE MEAL(S)
This might sounds crazy, almost like you're forcing yourself to eat clean for 6 days with the goal of an unhealthy eating day in mind. But no, you absolutely have to plan your cheat meal(s) beforehand! They should not be a spur of the moment decision, as you'll tend to overeat when your 'emotion' takes over and you'll start to lose focus on your healthy eating goals.

3. LIMIT YOUR CHEAT MEAL(S)
If you're born to be on team #eatclean and has minimal cravings, always, go ahead and limit yourself to just one cheat meal a week. If not, do limit it to 2 cheat meals a week (I usually do just brunch and dinner on my cheat days). Do not, I repeat, do not ever let your cheat meals turn into cheat days, which will eventually turn into cheat weeks and then into cheat months. 
A sensible diet is to always eat healthily with occasional indulgence, not the other way round.

4. PORTION CONTROL
Your cheat day is not your license to binge. 
Yes, it's cheat day so by all means indulge in some potato chips. But if it's stated 7 chips per serving, you eat just 7 chips and not the entire bag of 7 servings at one go just because it's cheat day. 
Doesn't work that way, sweetie. 

Well, I actually cheated for my first cheat meal and had it on the 21st day of my Weed-Seed-Feed diet.

Despite chomping down the entire deep fried battered chicken thigh that's bigger than my face and polishing off half of the crispy-fluffy waffles (I didn't touch the syrup though), I still managed to get a 0.7kg loss on my 3rd week's diet plan. :) 

But things got a little out of hand when I got to the 'true' cheat day on my 4th week.

First, I ate 1/2 a regular box of salted popcorn at Golden Village Cinema.

And then, lunch was more sodium from this bowl of yummy ramen at Menya Musashi.

Then it was half this bag of sugar coated churros with milk chocolate dip, along with half a bag of Chipster potato chips.
Dinner was Yu Tou Lu (fishhead steamboat) and marmite pork chop, which yet again, are sodium laden.
It was a total (refined) carbohydrates plus sodium overload in one day and the result was an almost 1kg weight gain from water retention the very next morning. Luckily, it normalised after 2 days and I actually lost another 0.4kg.

See my point about planning your indulgence meals beforehand and not just eating whatever you see?

My cheat day for my 5th week was definitely better, as I already had in mind what my indulgence for the week would be - WHITE RICE.


And so, brunch was sharing this huge plate of 3 Flame Monster Curry with the BF (I made a mental note eat less of the rice), followed by finishing 1/3 of a bowl of the Blackball Signature Grass Jelly dessert during mid afternoon, and finally Nasi Lemak with Fried Chicken and a small piece of mashed banana filled prata for dinner at Old Town White Coffee.

Weight loss for week 5 is another 0.7kg, increasing my accumulated weight loss over 5 weeks to be 4.5kg.

So how's your #eatclean diet plan coming around? Do share your experiences with me in the comment board below! :)

Till then,
Mia Foo