MollyMia Aspire to Inspire before we Expire

Tuesday, 27 October 2020

Steamboat King: Having your steamboat anytime, anywhere! [sponsored]

Have you ever had a sudden craving for steamboat, but just had to settle for just anything soupy because there's absolutely no time to go grocery shopping and finishing all the steamboat preparation works by the end of the day? 


Now, what if I'm telling you, you can get your steamboat lunch/dinner/supper (or even breakfast!) all setup and good to go in just ONE HOUR? 


I kid you not. With Steamboat King, you definitely can!

Rated as one of the Best 8 Steamboat Delivery in Singapore by BestInSingapore, Steamboat King provides an impressive service of a FREE 1-hour delivery islandwide, Steamboat King also carries portable accessories such as cookers and pots, making them your one-stop site to get literally everything you'll need to get your steamboat parties started in just ONE hour, ANYWHERE you fancy. 

With a team of brilliant chefs with over 30 years of culinary experiences, Steamboat King has put together winning recipes behind each of the 5 broths they're offering: Premium Collagen, Sichuan Mala, Tomato, Kimchi and Pork Tonkotsu

Steamboat Bundle B (3 - 4 pax) - $99 (Usual $129)

For just $99, we can get 4 portions of carbohydrates along with a selection of meat, seafood, vegetables and other frozen/processed food, along with 3 out of the 5 dipping sauces available on their menu. On top of that, there's also watermelon slices as dessert and a 1.5L bottled drink! 
You can also choose to get up to two of their complimentary 14cm portable stove sets!

For the broths, I went for kimchi and pork tonkotsu. And because my dad dislike kimchi (always saying it's smelly), we used the portable stove set for the kimchi broth and ended up only using half of the 1L pack (around 500ml?). My mum quite liked the kimchi broth too, and we saved up the broth to make kimchi soup a few days later. YUM! 
And now my mum keeps saying she want to buy their ala carte kimchi broth just to cook kimchi soup at home. HAHAHA!

The ingredients were all super fresh and well packed. Who would have thought that a steamboat meal at home can be such a fuss-free, open-and-eat kind of affair? 

One thing to note, the portable stove, although ridiculously cute, didn't really work that well. As I've mentioned earlier, we ended up using about only 500ml of the kimchi broth not only because the pot is really tiny, but also because you won't get the broth (and its content) to a boil at all. Not even a simmer. 
And as the broth came chilled, we had to heat the cold broth up in a pot over the hob before pouring the boiling broth into the portable stove pot. The broth only barely started simmering when we were nearing the end of our meal and burning out the 2nd pot of fuel. 
So if you're planning to hold a steamboat party outdoor, do considering getting a proper portable gas/induction cooker and pot or prepare your own cooker hobs and pots to heat up the broth instead of relying solely on the complimentary 14cm stove sets. 

And of course, if you're unwilling to be limited to their fixed choices in their bundle packages, you can always go for ala carte (from broths, to steamboat ingredients, right down to their carbohydrates and dipping sauces) ordering to get your ideal steamboat meal with all your favourite foods and flavours. 

For more information and ordering, visit Steamboat King's Facebook or website HERE 
Also, do check out BestInSingapore for more lists of the best of what Singapore has got to offer!
All food-styling photographs with credits to Owari Express Photography.

Till then,
Mia Foo


Wednesday, 21 October 2020

Mucota Omega & Mucota Infinia at Kudos by Headlines Hairdressing [Sponsored]

 If you've been following my blog and other random posts on my social media accounts, you should know that my frequent collaborations with Ken at Focus goes a long way back when I visited their Cuppage branch as a normal paying customer. 

Imagine my surprise when Ken told me, starting next month, November 2020, he will be moving over to Kudos by Headlines Hairdressing instead. 


Located at Hong Lim Complex, he's actually just shifted to the next building from where he's currently now  at (Chinatown Point). HAHA!


And so, other than snipping off a few more centimetres of my dry, scratchy hair ends and doing my usual Mucota Omega (hair rebonding) touch up, Ken also introduced the new (albeit, not THAT new, but still new to me) Mucota Infinia Hair Treatment. 


Touted as the number 1 anti-frizz hair treatment, Mucota Infinia is effective for highly damaged bleached hair, which tends to have cuticles that are wide open. Mucota Infinia contains acidic components that will help to close up the cuticles, hence making the hair soft and smooth again.
In addition, the treatment, although strong at repairing our hair from inside to ourside, is also lightweight and doesn't weigh the hair down. The treatment also takes considerably shorter time to complete, in less than an hour, with the effects lasting 4 to 6 weeks!

Unlike Mucota Scena, which comes in 3 or 5 steps, Mucota Infinia comes in either 3 (A, B, C) or 4 (additional S) steps. According to Ken, Mucota Infinia also contains less silicone, hence the treated hair may not feel as soft and silky smooth as compared to Mucota Scena. 

Yay to tidy, straight hair roots again! 

True enough, my hair felt a little stiffer compared to how it usually felt after doing Mucota Scena, but I love how quick Mucota Infinia takes, and still made my hair soft and smooth. It's been slightly more than 2 weeks since my hair appointment, and yet with daily washing, my hair still feels smooth to the touch!

Kudos by Headlines Hairdressing is now offering a 20% discount on all hair services to all first time customers. Otherwise, you can also quote "Mia Foo" to enjoy the same 20% discount promotion! 

Kudos by Headlines Hairdressing is located at 
531 Upper Cross Street, Hong Lim Complex #02-08

For more information and booking of appointments, check out their IG and FB page! 

Till then,
Mia Foo

Monday, 12 October 2020

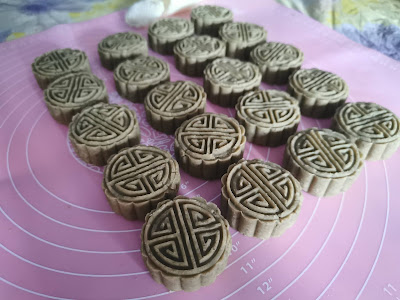
Mia Bakes: Mung Bean Cakes (绿豆糕)

挑战过了桂花糕,下一个就是你了 - 绿豆糕!
(After succeeding the Osmanthus Rice Cake, the next one shall be you - Mung Bean Cake!)


Initally, I bought a set of  the mooncake press-mould, thinking that perhaps I can have a try at making my own fusion mooncakes (eg. baked mooncake skin but with pineapple cake filling) this year, but the procrastination... 
Oh well, Mid-Autumn is long over, so let's make Mung Bean Cakes instead!

For 20 (33 - 35g) cakes, you'll need:

250g mung beans (dry, with skin)
35g unsalted butter
50g Gavia Sweetener (1:1 sugar replacement)
20g honey
15g full cream milk powder
a pinch of salt
(and ALOT of elbow grease)

recipe adapted from Amanda Tastes

The procedures to make this cake is really simple, just that you'll require a lot of elbow grease frying the mung bean puree into the cooked dough. But anyhow, let's get started!

To 250g of mung beans, add in some water to soak the beans for at least an hour or two, until the beans has expanded in size. Then, give the beans a good rinse and pour them into a pot. Add enough water just that all the beans are covered, and bring the water to a boil over high heat on the hob. Then, turn off the hob and leave the beans to "steam" in the covered pot for 15 to 20 minutes, before adding some more water (if it has dried up) and repeating the process (of heating until the water boils, turning off the heat, steaming the beans in the covered pot) for another 2 times, until the beans are thoroughly cooked through and soft. This trick will save you a lot of gas (or electricity, if you're using induction hob) and possibly some cooking time as well.
Do remember to not add too much water (just enough to cover the beans) while boiling them, if not your puree will end up extremely watery and you'll need longer frying time later on to reduce the puree into a dough. 

Pour the cooked beans and the remaining water into your food processor or blender, and blend into a fine puree. Do blend the beans for a while longer so as to better break down the skin. Otherwise, you can also remove the skin before cooking to get a smoother, finer cake texture. 
Then, pass the puree over a sieve and directly into a non-stick pan. You may also skip the sifting part if you do not mind a coarser mouth-feel in your cake. Also, if you've already removed the skin before cooking, sifting is also not required. 

To the puree, add in the butter, sugar, honey, milk powder and a pinch of salt. Then, start stirring the mixture NON-STOP over medium heat until most of the moisture in the puree has evaporated and the mixture will start to come together into a dough. 
Now, how long more to cook the mixture once they start to come together depends on how dry/moist you prefer your cake to be. But do note that if your dough is too moist, it's harder for the cake to take the shape of your mould, and if it's too dry, they'll crack easily. 


Transfer the hot dough into a clean bowl and cover with a cling wrap. Make sure that the cling wrap is touching the surface of the dough to prevent it from drying out. Then, leave it to cool/chill in the fridge. Once the dough has cooled down, it's time to start shaping! First, divide your dough into equal portion sizes and roll them into balls. You can do this by first weighing the total weight of your dough and dividing it by how many pieces you wish to get. Just make sure that the size of your dough ball doesn't exceed the capacity of your mould press (mine is a 50g mooncake mould press). 
Then, oil your mould press to prevent sticking, and start pressing away! 

Tadaa~

I'll probably increase the amount of sugar the next time I attempt this, as this batch has an extremely obvious "low-sugar" taste. HAHAHA! 


Taste wise, due to the very subtle sweetness, the mung bean flavour is very prominent. My dad actually asked that I try covering some in flour batter and deep-fry them, saying it'll taste just like Kuih Kasturi (the mung bean fritters selling at most Goreng Pisang stalls). 
 HAHAHA!

Till then,
Mia Foo