MollyMia Aspire to Inspire before we Expire

Tuesday, 5 May 2020

Ume Tonya 梅問屋 Plum Juice Concentrate [sponsored]

Do you know that plums are plentiful in minerals like potassium, fluoride and iron, and other health benefiting compounds such as dietary fibre, sorbitol and isatin? They are also rich in antioxidants, which are helpful for reducing inflammation and protecting our cells from damage by free radicals. In addition, plums are found to be particularly high in polyphenol antioxidants, which have positive effects on bone health and may help to reduce the risk of heart disease and diabetes!


And with the current #stayhomeforSG situation to keep ourselves safe from COVID19, I can't be any more glad to receive the Ume Tonya Plum Juice Concentrate from SampleStore.com to give me a healthier alternative to my daily dose of ice-cold sweet drink to beat the unbearable heat of being cooped up at home all day long. 
Oh, did I forget to mention that I do not have an air-conditioner at home? 


Made with preserved plums, the juice concentrate has no added preservatives and flavouring, and is the perfect drink to quench thirst and replenish the salt and mineral content in our bodies during hot weather. And each serving is barely 67 kcals! No worries about this contributing to our ever-growing waistline. 


Preparation can't get any simpler. Just empty the content of 1 sachet into your mug, top it up with cold/hot water and stir till combined! If you'll prefer a lighter taste to your plum juice drink, just add slightly more water to dilute the concentrate (but why would you, 250 - 300ml is perfect!) to suit your personal preference! You just can't mess this up. 


I'm a huge fan of tangy flavours and this plum juice concentrate is right up my alley! It's the right balance of sweet and sour, that's super light and refreshing on the taste buds, the perfect drink to reach for right after a meal. 


And guess what, you can now redeem your free bag of Ume Tonya 梅問屋 Plum Juice Concentrate samples (3 sachets) from Sample Store right HERE
Also comes in a a box of 12 sachets going for only $8.50 HERE

Till then,
Mia Foo

Sunday, 3 May 2020

Mia Makes: 2 Ingredient Yogurt Bread & Cabbage Hashbrown

With the  Circuit Breaker measure ongoing here in SG, it seems like everyone has turned into a social media baking/cooking guru. HAHAHA! >.<
While the flours are flying off the shelves and everyone is trying to make themselves muah chee, breads and... I don't know, tapioca boba pearls (??), I've (somehow) went the other way and tried to find quick and easy recipes with as little ingredients as possible (and preferably lower calories/healthier alternatives). 

And so here's two of the recipes I've found on the internet that is super quick and easy to make, which turned out really well!

The first one is the 2-ingredient dough that was supposedly trending on IG, which I read about on Buzzfeed. 
The ingredients are really simple, just greek yogurt and self raising flour. If you do not have self-raising flour, you can make yourself some by adding baking powder and salt to plain flour, but that won't be "two-ingredients" anymore. 

So, to get yourself 1 serving of this quick bread, you'll need:
1/4 cup self raising flour
1/4 cup Greek (or drained) plain yogurt.
An additional pinch of salt (optional, for more flavour) 

First up, make sure your yogurt is GREEK YOGURT, the thicker the better, for the 1:1 volumetric ratio of this recipe to work. Otherwise, you can use normal plain yogurt, but reduce the amount of yogurt (start with just adding 2 tbsp first and slowly adding more if the dough is too dry) to get a workable consistency. 
Depending on what exactly you want to get out of the dough (bagel, pizza, bread bun etc), tweak the amount of yogurt to add to get the best dough consistency. For example, if you are planning to make a pizza out of the dough, you'll be better with a dough that's still soft but definitely not sticky at all. The lower hydration of the dough also meant that your "bread" will be less soft and fluffy. 
But for me, as I was just making a "English muffin" lookalike bread on the hob out of it, which needs minimal shaping and handling, I could get away with a much more sticky dough, as I could easily just dump the lump of wet dough directly onto my hot pan from the bowl of I wanted to. 
But I didn't, I chose to dust some flour over the wet dough and briefly shaped it into a round muffin shape before cooking it over a non-stick pan on low heat over the hob, with lid on, for around 5 to 6 minutes on each side, until the bread is browned to your liking and when pressed down with a finger, it springs back up.
And yes, I prefer my bread more evenly browned and "toasty".

I used about 3 tbsp normal plain yogurt to 1/4 cup flour and got really soft and fluffy bread. I also added a generous pinch of salt, which gave my bread a delicious salty flavour. YUMS!

And the other recipe I've tried for this meal is a healthier alternative to hashbrown, the cabbage-hash. I first saw this recipe from Erwan Heussaff's video, in which he actually used about 2 eggs to 1 cup of shredded cabbage & white onions. But I found that the overall dish didn't really work that well. Basically the egg and cabbage are pretty separated, and even with my effort to squish them together into a patty while they cooked, the final consistency of this "hashbrown" still tasted more like cabbage stir-fried in eggs to me. 

As you can see, the shredded cabbage and eggs aren't really together

So here's my tweaked recipe for the cabbage-hash:
180g - 200g shredded cabbage 
(you can sub part of the cabbage with white onions if you fancy them)
2 medium eggs
1-2 tbsp corn flour or plain flour
(corn flour will make it crispier)
Seasoning of your choice 
(I used garlic salt and the good old black pepper)

Just dump everything into a large bowl and mix until well combined. So simple!
For me, I prefer to beat the eggs and add in my seasonings first, before adding the egg mixture into the shredded cabbage and tossing them around for abit to get all the cabbage coated with the egg mixture before stirring in the flour to thicken the mixture. 

Then, pour the mixture onto a well greased pan and cook over medium heat until browned to your liking. I cooked my entire bowl of mixture into one huge "pancake" that's the size of my happycall pan, but I'll advise that you make smaller individual hashbrown sizes for easier cooking and flipping. 
Cooking time and heat also varies according to how you'll prefer your "hashbrown" to turn out. Do you prefer your cabbage softer or crunchy? The longer you cook over lower heat, the softer your cabbage will get. 
So just trial and error and get this low-calorie, low-carb "hashbrown" to your best liking! 


And yes, I repeat. DO NOT attempt to cook the entire batter into 1 huge pancake unless you have a happycall pan like I do. I just flipped the entire pan over to cook on the other side. HAHA!

Till then,
Mia Foo

Wednesday, 29 April 2020

Mia Bakes: Osmanthus Rice Cake

I vaguely remembered my very first taste of the Osmanthus flavour that wasn't just purely sugar in disguise in the form of some green tea, was a good 8 years ago during my visit to Suzhou/Hangzhou, China when I had a taste of 桂花糕 (osmanthus cake). 

-credits to guilinholiday-

Not to be confused with the jelly version, the traditional osmanthus cakes are made with a mixture of rice and glutinous rice flour, osmanthus flower and sugar, and then steamed over boiling water till set/cooked. When eaten warm, they're soft and slightly chewy with a distinctive osmanthus scent and a very mild and subtle sweetness. When cooled, they'll actually turn pretty hard and dry, like a crumbly, powdery biscuit. 

This type of traditional 桂花糕 is nearly impossible to find in Singapore, so I guess the only way for me to taste it again is to make them myself! And when's a better time than now to do it, when everyone is snatching plain/bread/cake flours for baking and tapioca starch for boba pearls? 


To get 8 servings of 桂花糕, you'll need:

100g rice flour
25g glutinous rice flour
60ml brewed osmanthus tea 
(I used 2 tsp dried osmanthus flower and 1 tsp sugar in a cup of hot water and left it to steep until cooled) 
6 deglet noor dates, pitted and chopped
45g brown sugar 
(you may omit the dates and use more sugar)
Mould(s) of your choice

recipe adapted from Amanda Tastes

I used a silicon cake mould, but I will advise against it as it's too wobbly on its own and will cause the cake to crack when you are putting it into the steamer. You can also make smaller versions in a muffin tin. :) 

It's actually pretty simple to make these osmanthus cake. In a clean bowl, add in the rice flour and glutinous rice flour and give it a quick stir with a balloon whisk to combine. Then, slowly trickle in the osmanthus tea as you continue stirring the flours. It will slowly form small lumps, and you may need a little bit more tea, depending on the hydration level of your flours, so always make sure you have more than just 60ml of the liquid on hand. Add enough water such that there's no pockets of dry flour and you can get the flour to stick together into a piece of dough by just pressing them in your hands. And at the same time, with the slightest pressure of your fingers, you can crumble the big piece of dough back into its powdery form. Drain out the osmanthus flower from the rest of the tea, pat them as dry as you can and set them aside. 

You can check out Amanda's video (link above under ingredient list) to better understand the flour condition you should get.

After the flour mixture is hydrated, comes the hardest part. Sifting!
With a good amount of patience, slowly press the hydrated flour mixture through a sieve and into a large bowl. You'll eventually get back a bowl of fluffy flour mixture and then it's time to start assembling the cake!
Spray down your choice of mould with some non-stick cooking spray (or grease it with butter) amd spoon half the amount of flour mix into the mould LIGHTLY. Do not try to pack the flour down, but leave it light and fluffed. If you're left with an uneven surface, use a fork to even out the surface lightly without applying any form of pressure onto the flour. 
Then sprinkle the chopped dates and brown sugar evenly on top, making sure to cover up the whole surface, even the corners. If not you'll be left with corner pieces of the rice cake with no fillings in between. Take half of your drained osmanthus flower and sprinkle them over the sugar filling, before topping the mould up with the remaining half of the flour mixture. 
Even out the surface lightly with a fork before sprinkling the rest of the drained osmanthus flower over the top. 
Place the assembled cake into the steamer or over a double boiler on the hob and steam for 15 to 20 minutes until cooked. The cake is done when it's firm to the touch when you press down on the surface. 

The cake might be too delicate to handle when just hot out of the steamer, hence do leave it to cool down for a bit before trying to unmould and slicing it. 
My top flour layer was a little too thin, hence the cracks. T.T

When warm, this rice cake is soft and slightly chewy with a yummy sweetness from the chopped dates and brown sugar filling and a pleasant Osmanthus scent. If it weren't for the calories, I would have easily eaten all 8 slices at one go. 

When left to cool completely (overnight) the cake will significantly harden up to give a dry and crumbly texture, but still sweet and delicious!

Till then,
Mia Foo

Thursday, 12 March 2020

Japanese food delivered to your doorsteps with sushidelivery.sg [Sponsored]

 Craving for some Japanese food, but also feeling too lazy to head out to a Japanese restaurant? 
What if I tell you, you can get your craving fixed within an hour with just a few clicks of your mouse?
I kid you not, for that's really what it is with sushidelivery.sg
Just a few clicks of the mouse and there you have it, a scrumptious Japanese dinner coming up!

I know when it comes to Japanese food, especially for sashimi or sushi with raw fish, freshness is always an issue and some may feel that "delivery" and "freshness" doesn't complement each other that well. But at sushidelivery.sg, not only their fish are sourced daily from Osaka and Hokkaido, they're also flown to Singapore within 18 hours to ensure maximum freshness possible. 
In addition, all their cooked food are only prepared by their chefs upon receiving our orders and sent within the hour so there's no worries about getting delivered stale food that has been sitting around for hours.
 And while there's a good selection of fresh sashimi on sushidelivery.sg, I'm not really a fan of raw food (but I'm a huge fan of Japanese cuisine in general, so long they're cooked) so it's gonna be an order of bento, donburi and maki rolls! :)

Pork Cutlet (Tonkatsu) Set Bento - $12.90 (Usual $18.30)

At the current promotional price of $12.90, this is definitely a steal! The portion size of the tonkatsu is nothing short of generous and complemented by equally generous servings of fresh salad, chuka kurage (seasoned jellyfish) and takuan (picked daikon).

The tonkatsu was not only tender and flavourful, but still crispy on the outside when I tucked into it after taking a good 10-15 minutes taking my food pictures. >.<
Being a salad-fan, I have to say that their fresh salad didn't disappoint too, fresh and crisp with just the right amount of dressing to not make it too cloying.

Unagi Don - $15.90

No prize for guessing what the HB chose; the (his favourite) Unagi don.
 At just $15.90, he got quite a huge piece of the grilled unagi, along with an #eggpornworthy onsen egg.

 I'm personally not a fan of unagi, so it'll be unfair for me to comment on the taste of this. 
The HB surely enjoyed it though, especially when he could break the yolk and mix the onsen egg wholly into the rice that's already flavoured with the generous amount of unagi sauce slathered on the eel itself. 

Champion Floss Maki (8 pcs) - $15.90

Maki roll with chicken, avocado and cucumber, topped with nacho cheese sauce, tobikko (flying fish roe) and fried tempura batter bits.

Initially I wanted to get the Chicken Rainbow Maki because they look so IG-worthy but in the end I decided to go with the Champion Floss Maki as there's a worry that all the coloured toppings might not remain on top of the rainbow maki when delivered. HEH!


And I'm so glad I changed my mind because I love, love, love this, so much! The nacho cheese taste (which is so yums) hits you at the very first bite, followed by the saltiness of the tobikko and the savoury flavour of the seasoned chicken and crunch of the cucumber. And all in all, this myriad of flavour and mouth-feel is littered with the pleasant crunch of the crispy fried tempura batter bits. 
Well, it's a champion indeed. 
Just having 8 pieces is definitely not enough for a glutton foodie like yours truly.  T.T

Yam Net Sponge Roll (5 pcs) - $5.50

Although I'm not exactly a huge fan of (white) yam, I was no doubt intrigued by the name of this dish and wanted to try it even though I wasn't really sure of what exactly I'm going to get.  
 It turned out to be seasoned Japanese purple yam, wrapped in vermicelli net and fried till crispy! 

Purple yam, also known as Ube, is not to be confused with the purple sweet potatoes although they do taste really similar. I was also confused at my first bite and thought I was eating mashed purple sweet potatoes. 
But unlike the purple sweet potatoes, which tends to have a distinctive earthy (soil) taste that I do not appreciate, the Japanese purple yam do not have that unpleasant taste. As the yam is mashed, the creamy and smooth texture of the subtly sweet and fragrant puree complemented the crispy exterior of the fried vermicelli layer very well, and added a lot more dimension to the overall mouth-feel of this dish. Even though it's a deep-fried dish, it doesn't feel overly oily and cloying at all.

Other than the usual bento, donburi, sushi, sashimi and sides, sushidelivery.sg also has sushi/sashimi party sets to make life much easier for you when you're looking to host a mini party for your sushi-loving friends. It's also a plus point that they actually do not skimp on the "plating" aspect of their food in spite of them being delivery-based, which also add on to our "dining experience" in the comfort of our home. 
Two thumbs up for you, sushidelivery.sg! 

sushidelivery.sg is open from 10am - 11pm daily, offering free delivery for all orders above SGD $60.
For more details and orders, visit their website HERE

Till then,
Mia Foo

Wednesday, 12 February 2020

Mia Bakes: Kinako Applesauce Muffins

Couple months ago, I chanced upon Kinako (roasted soybean flour) at Daiso and quickly picked a pack up, planning to make myself some injeolmi or some other form of mochi/glutinous rice cake snacks....
But I never did. xp

So these happened instead.

As I also happen to have a couple more mini tubs of applesauce leftover, I decided to bake myself some applesauce kinako muffins!

So to get 8 ~ 9 small muffins, you'll need:

45g salted butter
40g castor sugar
25g kinako
100g all purpose flour
225g unsweetened applesauce
1/2 tsp baking powder
1/2 tsp baking soda
1 tsp vanilla extract
your choice of toppings/fillings, however little or much as you fancy
(I've used dried cranberries+pumpkin seeds & mini chocolate chips+chopped peanuts)

Making these healthier (less butter & sugar?) muffins can't get any simpler for it's pretty much a one-bowl recipe, unless you're indecisive and greedy like me and wanted to bake 2 variations at the same time. 

In a clean bowl, whip up your soften butter slightly before beating in the castor sugar until it's fully combined. Then add in the applesauce and vanilla extract and give it a whisk until combined. You may find a little separation/curdling of the butter from the applesauce, but that's perfectly fine. 
Then, add in all your dry ingredients and fold until just combined (or even a few streaks of flour is also fine) before adding in however much (or little) or your favourite topping/filling and folding until just combined. 

Drop the batter into your lined or greased muffin tins until they're 80% full (they'll puff up in the oven, but will drop back down and flatten when cooled) and bake them at 180 degree Celsius for around 20 - 25 minutes, until a toothpick inserted in the centre comes out clean (no wet batter, just a few moist crumbs). 

The texture of these muffins made (nearly) wholly from applesauce as the wet ingredients are extremely moist and soft, nearly fudgey, almost like they're under-cooked. 
So if you're not the type who'll appreciate an (overly) moist muffin, then you might need to reduce the amount of applesauce and replace them with some milk instead. 
The addition of Kinako added a fragrant, nutty flavour to the muffins, which is soooooooo good! 


As you can see, it was go big or go home for me on the fillings for this particular bake. 
Gave 2 of each flavour to Sa and she commented: The fillings are more than flour, very shiok! 
HAHAHA!
Well, it's always my dream to bite into a muffin and be welcomed with a mouthful of chocolate chips, so.... HEH!

Till then,
Mia Foo

Tuesday, 14 January 2020

Bloom Studio - Preserved Flower Domes [Sponsored]


And I got bloomed... domed....(??), thanks to this beautiful preserved flower dome from Bloom Studio!

Bloom Studio is made up of a humble, small team of florists from Korea with big hearts. As an effort to minimise floriculture carbon footprint, Bloom Studio offers preserved flowers as an alternative to fresh ones. Preserved flowers, not to be confused with dried flowers, are 100% real flowers that have undergone preservation techniques to maintain its freshness, suppleness and shape. This non-corrosive, toxic-free, non-carcinogenic and non-chemical reactive process is definitely eco-friendly and allows the flowers to last from several months to years and it's almost maintenance-free!


Fresh flowers requires refrigeration to keep them fresh and alive in transit. This burns more fuel and thus emits more carbon dioxide into the atmosphere. Most people also tend to discard the flowers once they start to wither in matter of days or at best, weeks, which is extremely wasteful. All these ultimately contributes to climate change, and Bloom Studio wants to do good for the environment by starting small. After all, no effort is too little and every small change can lead to a great impact.
Preserved flowers are more economical because they require low maintenance; without the need for plant care products and need not be replaced from time to time. Moreover, Bloom Studio's bouquets are also wrapped in environmentally friendly packaging like butcher's paper.


Bloom Studio has very generously sent me Ashlyn, a preserved flower dome with a beautiful combination of sea-foam green and pastel pink roses, along with hydrangea and foliage. 

Two of my favourite colours paired together, and bundled up in a pink ribbon! How cute is that!

And as I've mentioned, Bloom Studio is a team of florists with big hearts, and they're donating 5% of their sales to their partnered local animal shelters. If you are unaware, our local animal shelters are facing challenges from limited space and finances, and are always facing risks of shutting down. So while you're making a purchase at Bloom Studio, you're also contributing to their cause to help our furry friends. 

And with Valentine's Day being just a month away, Bloom Studio has already started their Valentine's Day pre-ordering, which will save you up to 30%! 

For more information on Bloom Studio and to view their selection of preserved flower domes and bouquets, visit their website HERE

Till then,
Mia Foo

Wednesday, 1 January 2020

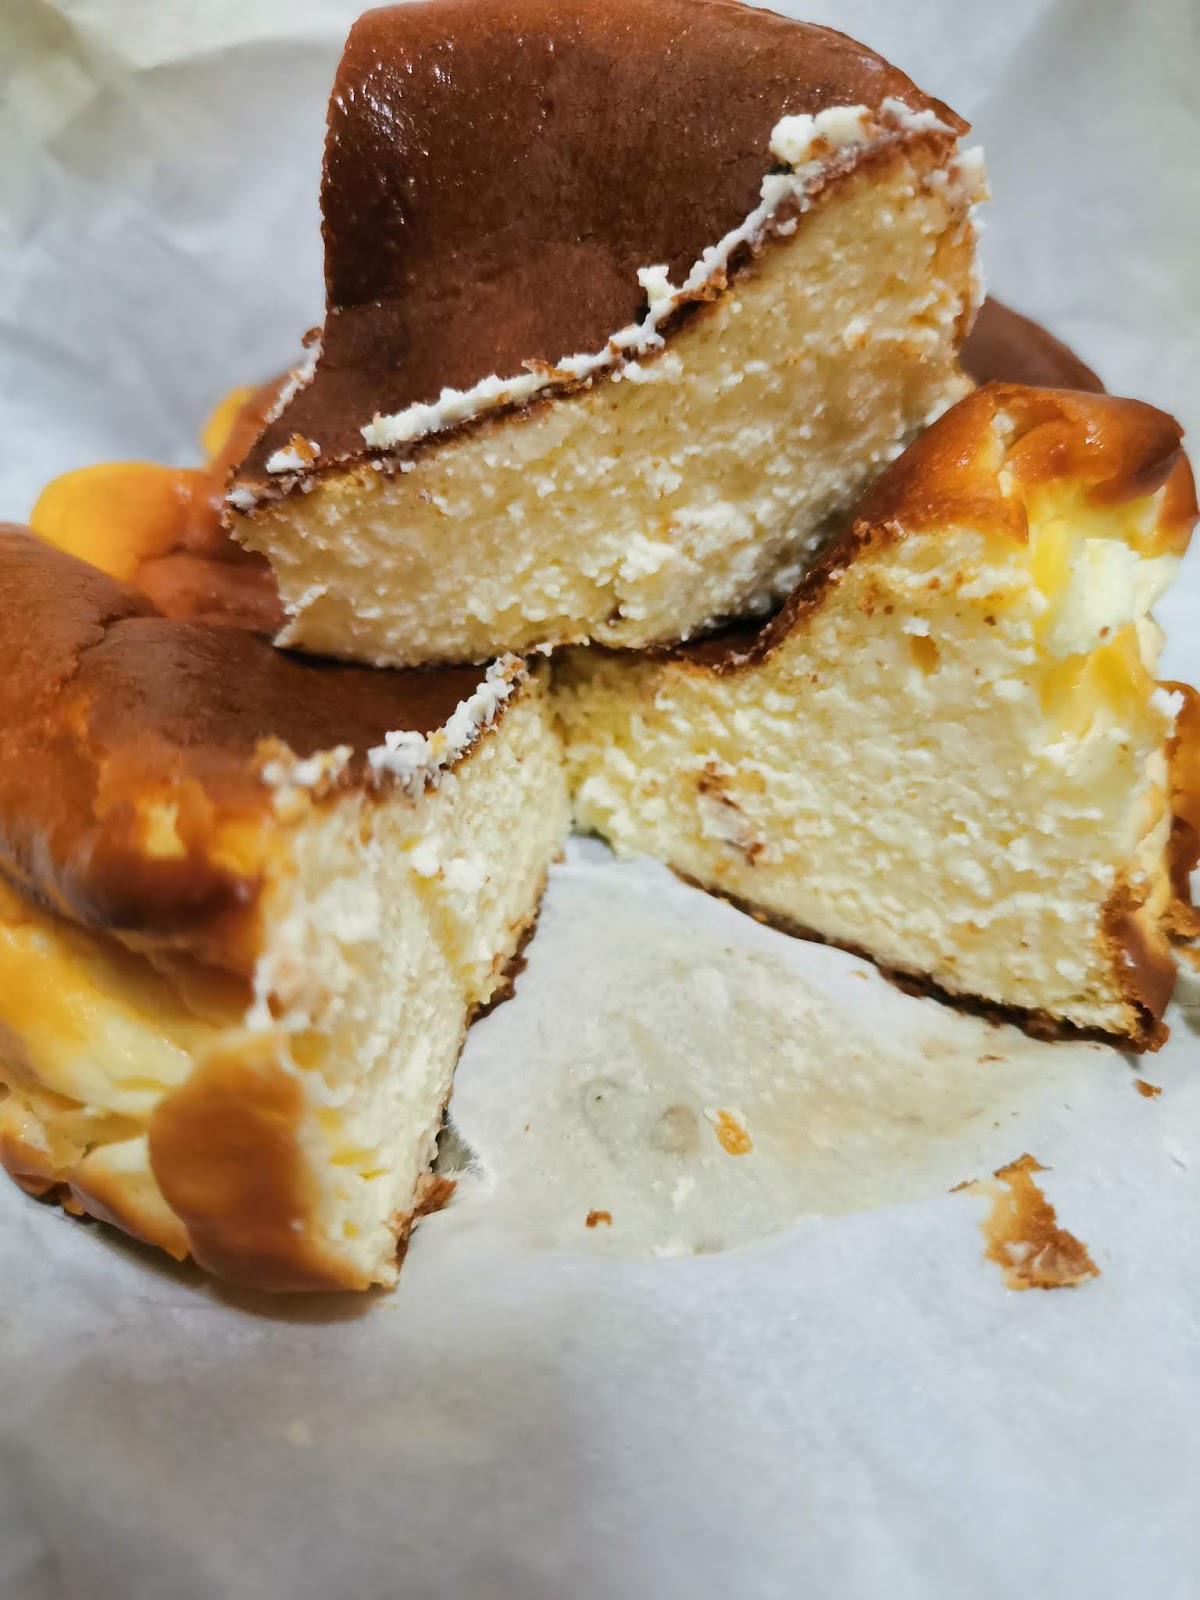
Mia Bakes: Burnt Basque Cheesecake

Yes, after contemplating about it for so so so long (I first came across a youtube video of this cake waayyy before it started appearing in our local cafes/bakeries, and had wanted to try it back then) I finally tried it. 

The (once very) trendy Burnt Basque Cheesecake, which ended up being more golden then burnt. 
But anyway, let's get over with the ingredients to get started!

To get 1 small 5' - 6' cake, you'll need:

227g cream cheese, soften
(I used Cowhead, if you're using Philadelphia then 250g is fine too) 
45g sugar 
(I mixed 15g stevia and 15g icing sugar) 
1 tbsp honey
100ml whipping cream
2 medium eggs
10g all purpose flour

First up, pre-heat your oven to 220 degree Celsius. It's very important that you pre-heat your oven first because of the higher than usual temperature you need to get, plus it takes literally just minutes to put your cake batter together. If you're quick enough, you might even finish the batter before your oven is pre-heated! >.<
Anyway, after getting the oven out of the way, line your cake pan with a piece of parchment paper. There's no need to line it to size, but just roughly push a square/rectangular sheet of parchment into your pan and let the edges fold onto itself at the sides of the cakepan.

Do keep around 3' of overhang upright (shown in picture)  to 'catch' the cake as it rises in the oven during baking.

Now, making this cheesecake can't get any easier, and you can easily make it in 1 bowl.
First up, beat your soften cream cheese in a large bowl to loosen it up before beating in the sugar until well combined. Then beat in the eggs, one at a time, until the mixture is well combined.
To the mixture, add in the honey and whipping cream and mix again before finally adding in the flour and mixing until you get a homogeneous mixture.
Pour the mixture into your lined cake pan and let it bake in the oven at 220 degree Celsius for 10 minutes, before reducing the temperature to around 200 degree Celsius and bake until the surface of the cake is browned/burnt to your liking.

After the cake is done, leave the door of your oven ajar and allow the cake to cool completely before letting it chill in the fridge overnight (or at least 4 hours) for the cake to set.
Do take the cake out from the fridge and allow it to come up to room temperature before eating though. 
Tadaa~ 

Rich and creamy with a slightly caramelised taste at the "burnt" edges, it's no wonder there's so much hype for this cake! 
If you're after the molten, lava centre effect, perhaps you can tuck into the cake once it's cooled and without chilling in the fridge, but don't quote me for this as I've not tried it. 
And I don't really understand why would you want a molten centre for this cake either, this is no cheese tart nor chocolate cake. 

edit: I've made a lower calorie version (and added biscuit base) using Ricotta HERE

Till then,
Mia Foo


Monday, 30 December 2019

NanoMD Bright [Sponsored]

And so, after trying out Dermagold's amazing New Elite Miracle C+ Serum, I'm really glad to be able to try out their newly launched skin supplement, the NanoMD Bright!

The NanoMD Bright is the world's newest and most advanced supplement for skin protection, nutrition and brightening. It represents the cutting-edge scientific discovery in the nutrition and nano technology in a one-tablet-a-day form. Although topical lotions provide an essential protection of the outer layers of your skin, this exciting new pill can do what no topical cosmetic skin agent can: improve the deeper structure of your skin
-www.mynanomd.com-

Sounds really amazing, right?
With ingredients such as Pygnogenol, Tomato Phytoconcentrate and L-cysteine, NanoMD Bright helps to brighten our skin tone, reduces pigmentation and improves our overall skin texture from within. Its nano formula not only addresses pigmentation, but also provides an additional sun damage reduction and systemic photo-protection (oral sunblock, YES!), which will build up slowly over several weeks of consumption. 
The fact that NanoMD Bright comes in the form of a pill, to be ingested and not applied topically, means that we will gain years of healthy and glowing skin, not just on our face, but all over our entire body.

I personally like how the tablets come in such handy-dandy packs, which makes it so much more convenient and easier to bring out in your smallest purse. 

NanoMD Bright now retails at dermagold.sg (HERE) at $179 for 1 month's supply.
For more information, visit https://www.mynanomd.com/

Till then,
Mia Foo